Best Router Bits for Box Joints: Accurate Cuts and Tight Fits
What's inside
As an Amazon Associate I earn from qualifying purchases. This post may contain affiliate links at no extra cost to you.
Contents
Best Router Bit for Box Joints: The Direct Answer
For most box-joint jigs, the best router bit for box joints is a sharp, carbide-tipped straight bit whose cutting diameter matches the jig’s finger spacing. Choose a spiral bit when cleaner shearing cuts matter more than cost, especially in plywood or tear-out-prone hardwood. Before buying, check three specs together: diameter, cutting length, and shank size—the bit must cut the full thickness of your stock without its shank or uncut shoulder contacting the work.
There is no universally correct diameter. A jig made for 1/4-inch fingers generally needs a 1/4-inch bit; a jig designed around 3/8-inch fingers needs a 3/8-inch bit. A near-match is not a reliable substitute: even a small difference changes finger width, and repeated joints will not fit together cleanly.
As an Amazon Associate we earn from qualifying purchases at no extra cost to you.
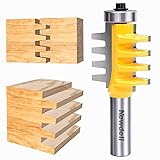


Straight vs. Spiral: Which Bit Suits Your Jig?
| Bit type | Typical box-joint sizes | Cutting action | Best fit for | Trade-off |
|---|---|---|---|---|
| Carbide-tipped straight | 1/4 in. and 3/8 in. diameter; often 1/2–1 in. cutting length | Edges cut across the full width at once | Most dedicated jigs, occasional use, and lower-cost setups | More likely to leave fuzz or tear-out in brittle grain; clear chips between cuts |
| Upcut spiral | 1/4 in. and 3/8 in. diameter; cutting lengths commonly around 1/2–1 in. | Pulls chips upward and shears fibers progressively | Deeper cuts and improved chip evacuation | Can lift fibers at the top face; use a backer or climb-resistant hold-down |
| Downcut spiral | 1/4 in. and 3/8 in. diameter; cutting length must cover stock thickness | Pushes fibers down into the work | Cleaner top edges on veneered or tear-out-prone material | Can pack chips into the cut, so shallow passes and good dust extraction matter |
| Compression spiral | Commonly 1/4 in. or 3/8 in.; verify its compression zone and cut length | Combines upcut and downcut sections | Two-sided edge quality in suitable sheet goods | More specialized and costly; the stock thickness must engage both cutting directions |
These are common size ranges, not guarantees for every bit. Manufacturers vary in cutting length, overall length, and spiral geometry. Confirm the actual product drawing and your jig’s instructions before ordering. A spiral bit is not automatically more accurate: the jig, bit diameter, workpiece support, and setup determine the fit.
Choose a straight bit for a simple, economical setup
A straight bit is a sound choice when the jig specifies it, the stock is solid wood, and the cut is modest in depth. It is widely available in common diameters and is typically less expensive than a comparable spiral bit. For clean results, use a sharp carbide cutter, secure the work, and avoid forcing the router. A dull bit can burn wood and leave rough walls even if its nominal diameter is correct.
Choose a spiral bit for chip control or fragile edges
Spiral geometry can improve the cut by slicing fibers progressively rather than striking the whole width at once. An upcut helps carry chips out of a deeper slot; a downcut can support the top veneer or face. For box joints, that benefit has to be balanced against chip direction: downcut bits may trap chips, while upcut bits may lift fibers. Dust extraction, a sacrificial backer, and a test cut help manage either issue.
Match Bit Diameter to Finger Spacing
With a finger-joint jig, the bit diameter usually defines the width of each slot, while the jig’s indexing pin or key sets the spacing between cuts. Those dimensions must work together. Follow the jig maker’s specified bit diameter and spacing; do not assume that a bit labeled 1/4 inch will produce a perfectly 1/4-inch cut in every setup.
Here is a practical sizing check: if a jig calls for 1/4-inch fingers and a 1/4-inch router bit, use that exact nominal diameter. A 6 mm bit measures about 0.236 inch, roughly 0.014 inch smaller than a 1/4-inch bit. That difference may seem minor, but it can leave a visible gap or require a different jig setup. Likewise, a 1/4-inch bit is about 0.014 inch larger than 6 mm. Use metric bits with metric jigs and inch bits with inch jigs unless the instructions explicitly allow a conversion.
Some jigs use a setup block or require a test piece to compensate for small differences. Make a trial joint from offcuts of the same thickness and material as the project. If the fingers are consistently too tight or loose, adjust the jig or bit height only as its instructions allow; changing bit height does not correct a width mismatch.
Check Cutting Length, Shank, and Stock Thickness
The cutting length must be at least as long as the material thickness that the jig requires the bit to pass through. For example, a 3/4-inch-thick board calls for a cutting length of at least 3/4 inch for a full-depth cut. A 1/2-inch cutting length cannot cut the full thickness in one pass. If using multiple passes is permitted by the jig, make sure the bit and setup remain securely guided at each depth.
Do not confuse cutting length with overall bit length. A long overall bit may still have a short cutting edge. Also check that the shank fits your router collet—commonly 1/4 inch or 1/2 inch—and insert it to the depth specified by the router and bit manufacturers. Never let the shank rub against the work or jig, and do not extend a bit farther than necessary.
| Your situation | Practical choice | Why |
|---|---|---|
| First jig; occasional softwood projects | Carbide-tipped straight bit in the jig’s specified diameter | Simple, commonly available, and cost-conscious |
| Frequent hardwood joinery | Quality carbide straight or spiral bit with adequate cutting length | Sharpness and accurate sizing matter more than choosing a particular geometry |
| Veneered plywood or fragile top face | Downcut spiral, if compatible with the jig and cut depth | Downward cutting action can reduce top-edge breakout |
| Deep slots or difficult chip evacuation | Upcut spiral with dust extraction and secure workholding | Upward chip removal can help keep the cut clear |
| Unusual stock thickness or a fixed-depth jig | Bit whose cutting length meets the jig’s required depth | Prevents an incomplete cut or an unsafe attempt to compensate by overextending the bit |
Setup Steps That Prevent Loose or Burned Joints
- Verify the jig specification. Confirm the required diameter, shank, and maximum stock thickness. These take precedence over general recommendations.
- Inspect the cutter. Look for chipped carbide, resin buildup, or a dull edge. Clean buildup with a cleaner approved for router bits; do not scrape the cutting edges with hard metal.
- Set the bit height carefully. Follow the jig’s method for matching cutter height to stock thickness. Lock the router before cutting.
- Clamp a test piece and backer. A sacrificial backer supports fibers as the bit exits and reduces breakout. Keep hands clear of the cutter path.
- Make a test joint. Use matching offcuts, then check both fit and shoulder alignment before cutting project parts. A tight joint should close with firm hand pressure, not force that risks splitting a finger.
- Clear chips and inspect between cuts. Packed chips can mar the cut or overheat the bit, particularly with a downcut spiral.
What Wears First—and What to Avoid
Carbide edges eventually dull, and resin or pitch can build up before the cutter is truly worn. Signs include increased feed resistance, burn marks, fuzzy edges, or repeated tear-out despite a sound setup. Clean the bit and test again before assuming it needs replacement. If damage is visible or the edge remains dull, replace it or have it professionally sharpened; do not keep pushing a failing cutter through a jig.
Common mistakes include buying a close-but-not-exact diameter, overlooking cutting length, using the wrong shank for the collet, and trying to correct finger width with bit height. Also avoid taking an aggressive cut or advancing the work against the jig incorrectly. Follow the jig and router instructions for feed direction, speed, and pass depth; keep the work clamped and use appropriate eye and hearing protection.
Bottom Line
For most woodworkers, a sharp carbide-tipped straight bit in the exact diameter specified by the box-joint jig is the best starting choice. Step up to a spiral bit when chip removal or edge quality justifies it, selecting upcut or downcut geometry for the surface you need to protect. In either case, confirm the cutting length against stock thickness, match inch or metric sizing precisely, and make a test joint before cutting your project parts.