Skil Router Table Review: Setup, Router Fit, and Workshop Space
What's inside
As an Amazon Associate I earn from qualifying purchases. This post may contain affiliate links at no extra cost to you.
Contents
Skil Router Table Review: Setup, Router Fit, and Workshop Space
The Skil router table is a sensible value for a space-conscious hobby shop if you want a compact benchtop setup for occasional edge work, but its appeal depends on careful router-fit checks and accepting a smaller, lighter work surface than a cabinet-style table. It is best suited to trim and profiling tasks—not frequent large-panel routing or production work.
What you get for the bench space
Skil’s benchtop table is designed to provide a routed opening, adjustable fence, insert rings, and basic featherboard-style work support in a portable format. Those features cover common jobs such as rounding over board edges, cutting shallow grooves, and making repeatable profiles. The trade-off is limited support around the bit: long or wide workpieces need additional infeed and outfeed support, and the table should be clamped securely before routing.
As an Amazon Associate we earn from qualifying purchases at no extra cost to you.
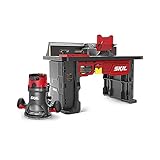

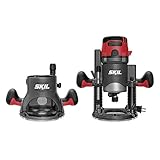

For a useful footprint comparison, the figures below are planning estimates for typical benchtop and cabinet-table formats, not a substitute for checking the current Skil manual or measuring the specific model. Product dimensions and included accessories can vary by model and revision.
| Planning factor | Skil benchtop format | Compact cabinet-table format | Why it matters |
|---|---|---|---|
| Approximate tabletop footprint | About 22 × 16 in. | About 24 × 32 in. | The smaller top is easier to store, but offers less workpiece support. |
| Approximate working height | About 11–13 in. above a bench | About 32–36 in. as a freestanding unit | A benchtop unit needs a stable bench at a comfortable working height. |
| Typical setup time, first assembly | Roughly 45–90 minutes | Roughly 2–4 hours | Allow longer if you need to adapt the router mount or add dust collection. |
| Storage requirement | One bench-top unit; router may remain mounted | Dedicated floor area | Check the space needed for the table plus the length of stock you route. |
| Best-fit workload | Occasional trim, grooves, and small parts | Regular routing and larger workpieces | Choose for the size and frequency of your work, not just the table’s footprint. |
The measurements and time ranges are practical planning benchmarks, not guaranteed manufacturer specifications. Measure the current model’s top and mounting plate before buying, and include room for clamps, dust hose, and the workpiece’s full travel path.
Assembly and fence adjustment: where setup time goes
Expect a straightforward but not instant assembly. The time-consuming parts are usually identifying the correct hardware, mounting the router, and getting the fence square to the table. A first-time owner should plan for about an hour, then allow extra time to check alignment and make a test cut. The estimates assume ordinary hand tools and no custom modifications.
- Sort the hardware first. Group screws, knobs, and brackets by size before assembly. This avoids forcing a near-fit screw into a threaded hole.
- Check the top and fence for debris. Dust or a stray chip under a fence face can make it sit out of line and affect a cut.
- Square the fence before relying on the scale. Use a reliable square against the table and fence, then tighten the locking points evenly.
- Make a shallow test cut. Check that the fence faces are aligned and the workpiece remains supported. Adjust the bit height and fence position in small increments.
- Recheck after moving the table. Clamping, transport, and repeated adjustments can shift the fence or loosen a mounting point.
Fence adjustment is adequate for routine positioning, but a compact fence has less mass and less bearing surface than a heavy aftermarket fence. Keep pressure against the fence consistent, lock both sides evenly where the design allows, and verify the setting after tightening. For repeat cuts, make a test on scrap rather than trusting a ruler or scale alone.
Router compatibility: confirm the mount before you commit
A router table is only useful if your router can be secured properly and its controls remain accessible. Compatibility can vary with the router model, base shape, mounting-hole pattern, and table revision. Do not assume that a router from the same brand will fit automatically.
Before buying, compare the table’s mounting instructions with your router’s manual. Check the base diameter, mounting-hole spacing, screw type, and whether the router can be installed without interfering with the table or fence. Also confirm that you can reach the power switch and adjust the bit height safely. If your router has a nonstandard base or requires a separate adapter, include that cost and setup effort in the value calculation.
For a compact hobby table, a fixed-base router is often simpler to mount than a plunge router. Some plunge-router bases can be fitted, but the arrangement may make above-table adjustment awkward or prevent access to controls. Use the router maker’s permitted mounting method; never improvise with screws that are too long or that could contact internal components.
Is it a good fit for your shop?
| Your situation | Fit | Reason |
|---|---|---|
| Beginner doing occasional edge profiles | Good, if the router fits | A compact table offers a more controlled alternative to guiding every small part by hand. |
| Very limited bench or storage space | Good | It can be put away between projects; account for clamps and hose as well as the tabletop. |
| Several hours of routing every week | Mixed | Frequent adjustments and a lighter fence may make a larger, sturdier setup more appealing. |
| Wide panels, long stock, or deep cuts | Limited | The small work surface needs auxiliary support, and larger jobs demand careful control. |
| Router not confirmed compatible | Wait and verify | An adapter or replacement router can erase the savings of a budget table. |
Ownership realities and value
The main long-term concerns are not exotic: fence alignment, loosened fasteners, dust buildup, and wear on contact surfaces. Fine dust can collect around the router opening and adjustment points, so clear it regularly with a brush or vacuum while the tool is unplugged. Check mounting screws and fence locks periodically, especially after moving the table. Replace damaged insert rings rather than routing with a loose or chipped opening.
Small parts deserve extra attention. Keep hands clear of the bit, use push blocks or appropriate guards, and avoid routing pieces too small to control safely. The fence and any featherboards help guide stock; they do not make an unstable workpiece safe. For larger pieces, add properly positioned support rather than letting the work tip at the table edge.
To judge the value, compare the table’s price with the cost of any needed adapter, router, clamps, and support. As a simple example, if a setup costs $150 in total and you use it for 30 projects, that works out to $5 per project before bits and maintenance. At only five projects, it is $30 per project. The arithmetic does not decide the purchase by itself, but it shows why compatibility and likely use frequency matter more than a low sticker price.
Verdict
The Skil router table makes sense for a hobbyist who wants a manageable benchtop station, has a compatible router, and mainly routes small-to-medium stock now and then. Its strongest practical advantages are modest storage needs and a feature set aimed at common home-shop tasks. Its limits are the compact support area, the need to verify router fit, and the care required to keep the fence aligned. If your work is large, frequent, or precision-critical, budget for a more substantial table and support system instead.


