Dual Action Sanders Explained: Best Picks for Wood and Auto Body
What's inside
As an Amazon Associate I earn from qualifying purchases. This post may contain affiliate links at no extra cost to you.
Contents
The short answer
Choose an electric random-orbit sander for general woodworking, a compact 3 mm-orbit dual-action (DA) sander for fine finishing, or a 5–6 mm-orbit pneumatic DA sander for fast, frequent sanding if you already have a compressor that can supply its airflow demand. “DA” describes a sanding action, not a single type of tool: in automotive refinishing it often means a machine whose pad both rotates and oscillates, while many woodworking “random-orbit” sanders use a similar motion.
DA versus random-orbit: what’s the difference?
A typical random-orbit sander moves its pad in overlapping circles while the pad spins freely. A DA sander also combines rotation and oscillation, but some models have selectable or fixed modes, different orbit sizes, or a more aggressive drive. The labels overlap in product listings, so compare the mechanism and specifications rather than relying on the name alone.
As an Amazon Associate we earn from qualifying purchases at no extra cost to you.

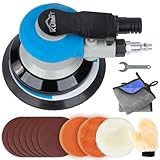


The orbit diameter is the width of the pad’s eccentric movement. A larger orbit generally removes material faster but leaves a more pronounced scratch pattern; a smaller orbit is easier to control for fine finishing. Neither design guarantees a swirl-free result. Clean abrasives, a flat pad, suitable grit progression, and light pressure matter just as much.
Compare the formats before choosing
| Format | Typical orbit | Typical pad | Power and practical trade-off | Best fit |
|---|---|---|---|---|
| Compact electric random-orbit | 2–3 mm | 125 mm / 5 in | About 200–300 W; plug-in convenience, modest removal rate | Small shops, furniture, occasional use |
| Full-size electric random-orbit | 4–5 mm | 125 or 150 mm / 5 or 6 in | About 300–400 W; versatile, with no compressor required | Cabinet parts, panels, regular woodworking |
| Pneumatic DA, fine orbit | 2.5–3 mm | 150 mm / 6 in | Often roughly 10–18 CFM at working pressure; light tool, but needs a capable compressor | Automotive finishing and fine sanding |
| Pneumatic DA, standard/aggressive orbit | 5–6 mm | 150 mm / 6 in | Often roughly 15–22 CFM; fast stock removal, high sustained air demand | Bodywork, large panels, frequent shop use |
These are common specification ranges, not guarantees for every model. Check the tool’s stated air consumption at its specified pressure and compare it with the compressor’s delivered CFM at that pressure—not just the tank size or advertised peak output. A small tank may run a sander briefly, then leave the compressor cycling constantly and pressure sagging.
Pad diameter also affects the decision. A 150 mm pad covers broad panels efficiently, but a 125 mm pad is easier to control on narrow parts and around edges. Use the correct backing pad and disc size for the tool; a mismatched pad can impair balance, dust collection, and finish.
Best choices by situation
- Occasional woodworking, limited space: A corded 125 mm electric random-orbit sander with a 2–3 mm orbit is a practical all-rounder for furniture repairs and finish sanding. It avoids compressor cost and stores easily.
- One tool for boards and panels: Choose a 125 or 150 mm electric model with a 4–5 mm orbit and variable speed. It removes material more quickly than a fine-orbit tool while remaining useful for intermediate sanding.
- Frequent automotive refinishing: Consider a 150 mm pneumatic DA with a 5–6 mm orbit for shaping and primer sanding, plus a 2.5–3 mm model for finer stages. This pairing is useful only if the compressor can maintain the required airflow.
- No suitable compressor: Stay with electric. Buying a compressor solely for one sander can cost more, occupy more room, and add noise and maintenance; compare the full setup, not just the tool price.
- Delicate veneer or final finish preparation: Favor a smaller orbit, lower speed, and light pressure. A larger orbit can be used for earlier steps, but finishing with an appropriate finer grit reduces the risk of visible scratches.
How to get a clean, swirl-free finish
-
Match the orbit to the job. Use a larger orbit for efficient leveling and a smaller one for controlled finishing. On automotive panels, follow the paint or refinishing system’s grit recommendations.
-
Start with a flat, clean pad. Check that the pad is not torn, distorted, or loaded with dust. A damaged pad or grit trapped beneath the disc can leave circular marks.
-
Use a sensible grit progression. Remove the previous grit’s scratches before moving finer. Skipping grades may leave marks that only become obvious under paint, stain, or raking light.
-
Let the abrasive cut. Keep the sander flat, move steadily, and avoid pushing down hard. Excess pressure can slow the pad, create heat, and make the finish uneven. On edges, reduce pressure because the pad can tip and round them over.
-
Control dust and inspect between grits. Use effective extraction where available and clear the surface before checking it. Dust left behind can act like coarse grit under the next abrasive.
For woodworking, test the final grit and finish on an offcut of the same species. For vehicle panels, use the coating manufacturer’s process; a woodworking grit sequence is not a substitute for paint-system guidance.
Ownership costs and common wear points
Electric sanders are usually the simpler setup: the main ongoing costs are hook-and-loop discs, dust bags or extractor filters, and eventual pad replacement. Pneumatic tools can be light in the hand, but the complete system also needs a suitable compressor, hose, couplers, filtration, and sometimes a regulator or lubricator as the manufacturer specifies.
Hook-and-loop backing pads are common wear items. Heat, clogged dust, and repeatedly pulling discs off at an angle can shorten their life. Keep vents and extraction ports clear, replace worn discs rather than pressing harder, and follow the tool maker’s instructions for cleaning and lubrication. On air tools, moisture and dirty air can contribute to poor performance or internal wear; drain and maintain the compressor and air line as directed.
Budget roughly $40–$120 for many general-purpose electric sanders, with specialized or higher-end tools often costing more. Pneumatic DA tools commonly fall around $80–$250, before accounting for a compressor if you do not already own one. These are broad market ranges, and prices vary by region and features.
Bottom line
For most woodworkers, a 125 mm electric random-orbit sander is the best starting point; pick a 2–3 mm orbit for control or 4–5 mm for faster coverage. For frequent auto-body work, a pneumatic DA can be a comfortable, productive choice—but only when compressor airflow matches the tool. Compare orbit, pad size, and air requirements first, then rely on clean abrasives and a careful grit progression for the finish.