Best 45-Degree Lock Miter Router Bits for Strong Corners
What's inside
As an Amazon Associate I earn from qualifying purchases. This post may contain affiliate links at no extra cost to you.
Contents
Best 45-Degree Lock Miter Router Bits for Strong Corners
The best 45 degree lock miter router bit is one that matches your stock thickness, fits your router table’s collet, and can be set up securely with the fence and bit height aligned to the cutter’s centerline. For most woodworkers, a carbide-tipped, 1/2-inch-shank bit sized for the material they use most often is the practical choice; a larger-capacity bit makes sense only if your router, table, and workholding can handle it.
Lock miter bits cut complementary profiles into two pieces of stock so their long, interlocking faces form a 90-degree corner. The joint offers more glue area than a simple butt joint and helps keep the pieces aligned during assembly. Its main drawback is setup sensitivity: a small error in stock thickness, bit height, or fence position can leave a visible gap or a corner that will not close.
As an Amazon Associate we earn from qualifying purchases at no extra cost to you.


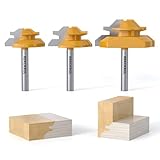
Quick comparison: choose by stock and setup
Capacities and shank options vary by model. The figures below describe common product classes, not guaranteed specifications for every bit. Confirm the manufacturer’s stated cutting capacity and setup instructions before buying.
| Bit class | Typical shank | Common stock-thickness range | Best fit | Setup and ownership trade-off |
|---|---|---|---|---|
| Compact, single-thickness bit | 1/4 in. or 1/2 in. | About 1/2–3/4 in. | Small projects and one regular stock size | Lower cutting load, but limited flexibility. A 1/4-in. shank should only be used within the bit and router makers’ limits. |
| Mid-capacity adjustable or multi-thickness bit | Usually 1/2 in. | About 1/2–1 in. | Furniture, cabinets, and changing stock sizes | More versatile, but requires careful bit-height adjustment and a stable router-table setup. |
| Large-capacity bit | Usually 1/2 in. | About 3/4–1-1/2 in. | Thicker stock and larger frames or boxes | Higher cutting load and a larger cutter. Check router power, speed limits, table opening, and workpiece support. |
These ranges are useful for narrowing the search, not for substituting for a specific bit’s manual. Some bits are designed for one nominal thickness; others accommodate a range through height adjustment. A bit’s advertised maximum capacity does not mean it can cut every thickness within that range in one pass or on any router.
Which type is right for your work?
Choose a compact bit for one repeatable stock size
If you mainly build boxes from 3/4-inch material, a bit explicitly rated for that thickness can be easier to dial in than a large, broad-capacity cutter. It also keeps the purchase focused on the job you actually do. Before buying, check whether “3/4 inch” means actual finished thickness or a nominal label; surfaced lumber and sheet goods can differ from their stated nominal size.
Choose a 1/2-inch-shank bit for regular shop use
When the router accepts it, a 1/2-inch shank is generally the more suitable choice for a large lock miter cutter: it provides a stiffer connection than a smaller shank. That does not make an oversized bit safe in an underpowered router or an unstable table. Check the router’s collet, the bit’s maximum speed, and the router-table maker’s guidance. Insert the shank fully to the recommended depth, then back it out slightly if the router instructions call for clearance at the bottom of the collet.
Choose a wider-capacity bit only when you need the range
For varied project thicknesses, an adjustable bit may save buying multiple cutters. The trade-off is more setup work, and the full stated range can still require careful calibration for every material thickness. If you will use one size repeatedly, a bit dedicated to that thickness may be simpler to set accurately.
| Your situation | Practical choice | Why |
|---|---|---|
| New to lock miters; building one small box | Bit rated for the measured stock thickness | Fewer variables to adjust; practice on scrap before cutting project parts. |
| Regular cabinet or furniture work | Carbide-tipped, 1/2-in.-shank bit with a suitable capacity range | Useful balance of rigidity and flexibility, provided the router and table are compatible. |
| Limited storage or occasional use | One bit matched to your most common thickness | A broad-capacity cutter is not worth extra setup if most projects use the same material. |
| Thick stock or long panels | Large-capacity bit only with adequate router power and support | Large cutters impose more load; long or heavy pieces also need reliable infeed and outfeed support. |
Set up for a tight, flush corner
The key is to treat stock thickness, bit height, and fence position as a linked setup. Do not assume the engraved mark on a bit or the nominal thickness printed on a board will produce a perfect joint.
- Measure the actual stock. Use a caliper or reliable thickness gauge on several pieces. If one board varies, joint and plane it to a consistent thickness first. A lock miter cut on uneven stock will not assemble flush along its full length.
- Check the bit and router compatibility. Confirm the shank fits the collet, the cutter’s capacity includes your measured stock, and the router can run the bit at the manufacturer’s specified speed. Install the bit with the router unplugged and secure the workpiece against the fence.
- Set the bit height from the instructions, then test. The goal is to center the mating profile in the stock so the outside faces meet flush. Make a shallow test cut in scrap of the same thickness and species. A test cut is more reliable than relying on a ruler alone.
- Align the fence to the cutter. Position the fence so the workpiece is supported close to the cutting area without touching the bit. On a split fence, align both faces to reduce gaps that could catch the stock. Use a straightedge across the fence faces to check alignment.
- Cut both mating orientations consistently. One piece is routed with one face against the table; its mate is routed in the complementary orientation, typically with an edge or opposite face against the fence as specified by the bit maker. Mark reference faces and edges on every part so you do not accidentally route two pieces alike.
- Adjust in small increments. Assemble the test joint dry. If the outside faces are offset, correct the bit height in tiny steps; if the joint rocks, gaps, or will not close, recheck thickness, fence alignment, and part orientation before changing several settings at once. Record the final settings for repeat work.
For long panels, use featherboards or other appropriate hold-downs and support the work before and after the cutter. Keep hands clear of the cutting path, avoid unsupported narrow pieces, and follow the router, bit, and table manuals. A lock miter bit removes substantial material, so do not force a cut or take a deep pass beyond the tool maker’s recommendations.
What affects joint quality over time?
Carbide edges stay sharp longer than typical high-speed-steel edges, but they still lose cutting performance. Dullness often shows up as burning, increased feed effort, fuzzy edges, or a joint that varies despite a stable setup. Resin and pitch buildup can also affect the cut; clean the bit with a product intended for router cutters, following its instructions, and avoid abrasive methods that could damage the edges.
Keep the bit stored so its carbide edges cannot strike other tools. Inspect it for chipped cutters, looseness, or damage before use; do not run a damaged bit. A clean, sharp bit and consistent stock thickness usually matter more than chasing a tiny fence adjustment to compensate for a cutter that no longer cuts cleanly.
Buying checklist
- Match the stated capacity to the measured thickness of your stock.
- Choose a shank that fits your router and is appropriate for the cutter size.
- Verify router power, maximum speed, table opening, and manufacturer guidance.
- Prefer clear setup instructions and a capacity range that matches your actual projects.
- Plan to calibrate on scrap; even a well-matched bit needs a test cut and fence alignment.
For a first purchase, a carbide-tipped bit sized to your most common material is usually the least complicated route to a reliable joint. If your projects routinely use several thicknesses, a compatible 1/2-inch-shank bit with a documented adjustment range offers more flexibility—but only if you are prepared to reset and test it for each stock size.