Best Homemade Router Table Plans and Components
What's inside
- Best Homemade Router Table Plans and Components
- Quick picks by workshop situation
- Plan 1: the simple benchtop homemade router table
- Plan 2: an enclosed router-table cabinet
- MDF versus plywood: which top should you build?
- Fence construction: the component that determines accuracy
- Leveling the insert plate and tabletop
- Dust collection and airflow
- Worked cost and sizing example
- Safety upgrades worth adding
- What wears first and how to maintain it
- Related Guides
- Best Homemade Router Table Plans and Components
- Quick picks by workshop situation
- Plan 1: the simple benchtop homemade router table
- Plan 2: an enclosed router-table cabinet
- MDF versus plywood: which top should you build?
- Fence construction: the component that determines accuracy
- Leveling the insert plate and tabletop
- Dust collection and airflow
- Worked cost and sizing example
- Safety upgrades worth adding
- What wears first and how to maintain it
- Related Guides
As an Amazon Associate I earn from qualifying purchases. This post may contain affiliate links at no extra cost to you.
Contents
- Best Homemade Router Table Plans and Components
- Quick picks by workshop situation
- Plan 1: the simple benchtop homemade router table
- Plan 2: an enclosed router-table cabinet
- MDF versus plywood: which top should you build?
- Fence construction: the component that determines accuracy
- Leveling the insert plate and tabletop
- Dust collection and airflow
- Worked cost and sizing example
- Safety upgrades worth adding
- What wears first and how to maintain it
- Related Guides
Best Homemade Router Table Plans and Components
The best homemade router table for most woodworkers is a rigid 24-by-32-inch cabinet or benchtop table with a 1-inch MDF or plywood top, a replaceable insert plate, an adjustable two-piece fence, and a dust port sized for a 2-1/2-inch hose.
That design balances accuracy, cost, storage, and safety better than either a very small portable table or an oversized permanent station. The right plan still depends on how often you route, how much room you have, and whether you already own a router lift, insert plate, or dust extractor.
As an Amazon Associate we earn from qualifying purchases at no extra cost to you.


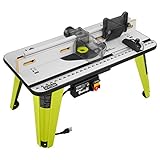

Quick picks by workshop situation
| Situation | Recommended design | Typical material budget | Why it fits |
|---|---|---|---|
| First router table, occasional use | 24 x 32-inch benchtop table with a laminated MDF top | $90–$180, excluding router | Low cost, easy to store, adequate for joinery and edge work |
| Frequent cabinet or furniture work | 24 x 36-inch enclosed cabinet with adjustable fence and dust collection | $180–$450 | More stable, quieter, and better for repeated setups |
| Limited floor space | 18 x 24-inch folding or clamp-on table | $60–$150 | Stores vertically, but gives up support for long stock |
| Large profiles and wide boards | 30 x 48-inch table with outfeed support | $250–$600 | Improves control, although it needs a permanent footprint |
Use the smaller designs for trim, roundovers, rabbets, and pattern work. If you routinely shape long rails, stiles, or panels, the extra length of a 24-by-36-inch or larger top is more valuable than saving a few dollars on sheet material.
Plan 1: the simple benchtop homemade router table
This is the best starting point when you want a useful table without building a cabinet. Make the top from two layers of 3/4-inch MDF, glue them together, and laminate the upper and lower faces with high-pressure laminate, thin plastic laminate, or a replaceable hardboard skin. The finished top should be about 1-5/8 to 1-3/4 inches thick.
Suggested cut list
- Two top layers: 24 x 32 inches, 3/4-inch MDF
- Four side rails: 3 x 30-1/2 inches, 3/4-inch plywood or MDF
- Two end rails: 3 x 22-1/2 inches, 3/4-inch plywood or MDF
- Fence faces: two pieces, 4 x 30 inches, 3/4-inch plywood
- Fence base: 6 x 30 inches, 3/4-inch plywood
- Four legs or mounting cleats sized to suit your bench
The dimensions allow roughly 1 inch of overhang around the supporting frame. Confirm the final opening before cutting: insert plates vary, and a plate intended for a specific lift or router may require a different aperture.
Cut the top layers oversize, glue them, and trim them flush only after the adhesive cures. A flush-trim bit or track saw gives cleaner results than trying to align two large panels perfectly during glue-up. Seal exposed MDF edges with polyurethane, shellac, or thinned wood glue; unsealed MDF absorbs moisture and can swell around screw holes.
Plan 2: an enclosed router-table cabinet
An enclosed cabinet is the better long-term design when the table will remain assembled. The cabinet adds mass, provides storage, and creates a controlled chamber for dust collection. A useful cabinet is approximately 24 inches wide, 24 inches deep, and 28 to 32 inches tall, with a 24-by-36-inch top mounted above it.
Use 3/4-inch plywood for the cabinet sides, bottom, and shelves. Plywood holds screws better than MDF and tolerates workshop humidity. Add a full or partial back panel to prevent racking, but leave an intentional opening for the dust hose and ventilation. A completely sealed cabinet can restrict airflow and make the motor run hotter.
Mount the router to an insert plate rather than directly to the tabletop whenever possible. The plate can be removed for service, and a lift makes bit-height changes faster. If you do not use a lift, provide enough clearance below the table to reach the router collet with two wrenches.
MDF versus plywood: which top should you build?
| Characteristic | Two-layer MDF | Birch or hardwood plywood |
|---|---|---|
| Flatness when properly supported | Very good | Good to very good |
| Edge durability | Needs sealing or edging | Better, especially with hardwood edging |
| Screw-holding ability | Fair; use inserts where possible | Good |
| Moisture resistance | Low unless sealed | Moderate; finish all faces and edges |
| Typical material cost for a 24 x 32-inch top | $35–$90 | $60–$150 |
| Best use | Flat, economical benchtop surface | Cabinet construction and durable structural parts |
MDF is often the best tabletop material because it is dense and stable when laminated on both faces. Plywood is the better choice for legs, cabinets, fences, and parts that receive repeated screws. A hybrid table—MDF top, plywood base, and hardwood edging—usually gives the best ownership result.
Fence construction: the component that determines accuracy
Build a two-piece fence rather than a single fixed board. Two adjustable faces let you compensate for the cut made by a bit, maintain support on both sides, and create a sacrificial opening for small profiles.
Make each fence face at least 4 inches high and 24 to 30 inches long. Keep the faces parallel and coplanar. A simple method uses two carriage bolts or threaded knobs passing through elongated slots in the fence base. Add washers or aluminum guide plates so the knobs do not crush the wood.
For better repeatability, add a measuring scale to the fence base, but treat it as a reference rather than a precision instrument. Always measure from the actual bit edge and make a test cut. A replaceable 1/4-inch MDF face lets you close the opening around a bit, reducing the chance that a narrow workpiece will fall into the gap.
Include a featherboard slot or mounting holes on the infeed side. Featherboards should hold stock against the fence without making feeding difficult. Excessive pressure increases friction and can cause burning.
Leveling the insert plate and tabletop
A router table is only as accurate as its highest edge. Rout a shallow recess so the insert plate sits approximately 0.003 to 0.005 inch below the surrounding top, or flush if your plate and recess are accurately machined. Do not rely on four corner screws alone to correct a warped plate.
Install six to eight leveling screws around the recess. Place them near the corners and midway along the long edges, then adjust them with a straightedge across the plate and tabletop. Lock the setting with jam nuts or thread-locking compound where appropriate. Check again after the first few hours of use because MDF can compress under fasteners.
Before routing the opening, mark the largest insert ring you expect to use. Leave enough material around the aperture to prevent flexing. A broad plate, typically about 9-1/4 by 11-3/4 inches or larger, spreads the router’s weight and provides better support for wide stock.
Dust collection and airflow
Use a dust port matched to the equipment you own. A 2-1/2-inch port is common for shop vacuums, while a 4-inch port is more suitable for a dedicated dust collector. A large port connected to a small vacuum does not automatically improve collection; airflow and hose restrictions still matter.
For an enclosed cabinet, place the main port behind the router and add a secondary fence port if practical. Seal unnecessary gaps with flexible weatherstrip, but leave ventilation openings or a filtered vent so the router is not operating in a completely stagnant enclosure.
A useful setup is a short, smooth hose run with a blast gate near the machine. Clean the router’s cooling slots regularly. Fine dust can accumulate inside the motor housing, especially when routing MDF, and restricted cooling shortens component life.
Worked cost and sizing example
Suppose you build a 24-by-32-inch table using two MDF panels at $35 each, $45 of plywood for the fence and frame, $30 for hardware, $45 for an insert plate, and $25 for a dust port and hose fittings. The total is approximately $215 before the router.
If you use the table twice per week for three years, that is about 312 sessions. The basic construction cost works out to roughly $0.69 per session, excluding router bits and electricity. Spending another $50 on leveling hardware and a replaceable fence face is usually worthwhile if it prevents one damaged insert plate or a poorly fitted workpiece.
Safety upgrades worth adding
- Install a large paddle-style power switch that can be reached without removing your hand from the workpiece.
- Use a bit guard or overhead shield when the operation allows it.
- Add featherboards before relying on hand pressure to control stock.
- Keep the fence faces close to the bit opening and use a starting pin for freehand work.
- Use a push block or push pad for narrow pieces; never place fingers near a rotating bit.
- Disconnect power before changing bits, adjusting the insert, or clearing packed dust.
- Wear eye and hearing protection, and use dust extraction suited to the material.
Do not use a router table with a loose collet, damaged bit, cracked insert, or fence that can shift under pressure. Take light passes—often 1/8 inch or less for hardwood—and feed the stock against the bit’s rotation. Make a test cut in scrap before committing to an expensive workpiece.
What wears first and how to maintain it
The replaceable fence faces usually wear first, followed by insert rings, leveling screws, and the tabletop finish around the bit opening. Keep a spare 1/4-inch MDF fence face and at least one spare insert ring on hand. Inspect the bit for resin buildup, check fence alignment monthly, and wax the tabletop periodically to reduce friction.
Common mistakes include using a single thin tabletop, leaving MDF edges unsealed, making the fence opening too wide, and cutting the insert recess before confirming the plate dimensions. Build the base square, verify the plate and fence with a straightedge, and let the table earn its complexity as your routing work grows.