Best Sanders for Stairs: Reach Tight Corners and Treads
What's inside
As an Amazon Associate I earn from qualifying purchases. This post may contain affiliate links at no extra cost to you.
Contents
Best Sanders for Stairs: Reach Tight Corners and Treads
The best sander for stairs is usually a compact 5-inch random-orbit sander for broad treads, paired with a detail sander for corners and riser edges. If you want one tool, choose a small triangular detail sander with a pointed pad; it can reach more places, but it removes material more slowly and leaves a less uniform finish across wide treads.
Quick picks by stair and project
- Mostly full-size wooden treads: A 5-inch random-orbit sander offers the best balance of coverage, control, and finish quality. A Bosch ROS20VSC or Makita BO5030K is a representative corded option in this class.
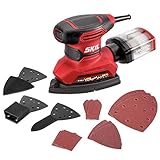
- Tight corners, spindles, and narrow returns: A triangular detail sander, such as the BLACK+DECKER BDEMS600, fits into spaces a round pad cannot reach.
- One cordless tool for varied repairs: A multi-tool with a sanding attachment, such as a DeWalt oscillating multi-tool, can handle edges and small patches. It is less efficient for whole treads.
- Stairs with both wide treads and detailed corners: Use a 5-inch random-orbit sander for the flats and a detail sander or sanding block for the last inch around obstructions.
Compare the shapes before choosing
Pad shape matters as much as motor power on stairs. A round pad covers a broad tread evenly but leaves small unsanded crescents near corners. A pointed triangular pad reaches into those corners, though its tip can dig into the wood if you press down or pause while the tool is running.
As an Amazon Associate we earn from qualifying purchases at no extra cost to you.


| Sander or representative model | Pad or sanding area | Approx. tool weight | Best stair use | Main limitation |
|---|---|---|---|---|
| 5-inch random-orbit: Bosch ROS20VSC | 5-inch round disc | About 3.5 lb | Broad treads and blending old finish | Cannot reach tight inside corners |
| 5-inch random-orbit: Makita BO5030K | 5-inch round disc | About 3.5 lb | Repeated tread sanding with a corded tool | Requires a separate corner-sanding method |
| Compact detail sander: BLACK+DECKER BDEMS600 | Small triangular base; model-specific replacement sheets | About 2.4 lb | Riser edges, narrow areas, and inside corners | Small footprint makes full treads slow |
| Oscillating multi-tool with sanding attachment | Typically a small triangular attachment; varies by model | Varies by tool and battery | Spot repairs and obstructed edges | More vibration and less efficient broad-area sanding |
Weights and pad descriptions are approximate; versions and included accessories can vary. Check the manufacturer’s current specifications and confirm that replacement abrasives match the exact backing-plate pattern. A nominally similar triangular sheet may not line up with the tool’s dust holes.
Choose by tread size, access, and workload
- For standard-width treads: Start with a 5-inch random-orbit sander. Its circular motion is less likely than a belt sander to leave obvious straight scratches, and the size is manageable when working one step at a time.
- For narrow stairs or boxed-in corners: A compact detail sander is easier to position. Measure the clear space beside the stringer or trim, and compare it with the tool body—not just the pad. The housing can hit an obstruction before the sanding tip reaches the corner.
- For a one-time refinishing job on a budget: A corded random-orbit sander plus a hand-sanding block is often a practical combination. Cordless models avoid a trailing cord on the stairs but add battery weight and can require spare batteries for a long job.
- For frequent repair work: Prioritize readily available hook-and-loop discs or sheets, a comfortable grip, and a dust port that fits your extractor. Consumable availability can matter more over time than a small difference in motor specifications.
How to sand treads, risers, and corners without creating uneven spots
- Check the existing finish. Remove loose coating and repair raised fasteners before sanding. If the old coating may contain lead or another hazardous material, stop and identify it using appropriate local guidance before creating dust.
- Choose grit for the job. For removing an intact finish, the right starting grit depends on the coating and wood condition; beginning too coarse can leave scratches that are hard to remove. When sanding bare wood or lightly worn finish, start finer and test in an inconspicuous area. Follow the finish manufacturer’s preparation guidance.
- Sand the tread with a random-orbit tool. Keep the pad flat, move steadily, and overlap passes. Do not lean on the sander: extra pressure can slow the pad and create uneven removal or swirl marks.
- Switch tools for the edges. Use a detail sander for corners and a sanding block where the tool body cannot fit. Keep the pointed pad moving and avoid pressing its tip into the grain.
- Work risers carefully. A detail sander gives better control than a large round tool on a narrow vertical face. Support your stance and manage the cord or battery so it cannot pull the tool off the edge.
- Vacuum between grits. Dust left on the tread can act like coarse grit under the next sanding pass. Vacuum the surface and clean the tool’s dust openings before changing to a finer abrasive.
- Inspect in angled light. Look for remaining finish, cross-grain scratches, and shiny low spots before applying a new coating. A clean, dry surface helps reveal defects.
Dust collection and long-term ownership
Stair sanding produces dust close to the worker and can spread it through the house. A built-in dust bag is convenient for small touch-ups, but a vacuum connected to the sander’s dust port usually provides more capacity. Check whether the port fits your hose directly or needs an adapter, and make sure the abrasive’s holes align with the pad. Poor alignment reduces extraction even if the sander has a capable dust port. Wear suitable eye and respiratory protection, and contain dust from nearby rooms.
Hook-and-loop abrasives are quick to change, but they wear out, load with finish residue, or lose grip. Replace discs or sheets when they stop cutting effectively rather than pushing harder. Periodically clear dust from the pad and vents, and inspect the backing pad: damaged hooks or a warped pad can cause poor sanding and premature abrasive loss. Keep dust bags and filters clean according to the manual; a clogged filter weakens extraction and can make the tool run hotter.
Typical broad market ranges are about $50–$120 for many corded 5-inch random-orbit sanders and about $25–$70 for basic corded detail sanders. Cordless kits can cost more when batteries and chargers are not already owned. Prices vary by kit, region, and sales, so compare the included dust accessories and pad format as well as the tool price.
Bottom line
For a set of ordinary wooden stairs, a 5-inch random-orbit sander is the best primary tool for the treads; add a compact detail sander or hand block for corners, risers, and edges. Choose a detail sander alone only when the stairs are unusually narrow or most of the work is confined to small areas. Before buying, check the tool’s body clearance, replacement-abrasive availability, and dust-port compatibility—those details determine whether it will be useful on your actual staircase.