Best Sanders for Decks: Picks for Boards, Railings, and Corners
What's inside
- Best Sanders for Decks: Picks for Boards, Railings, and Corners
- Best picks by deck-sanding job
- What matters more than the sander’s headline power
- Typical specifications and practical trade-offs
- Choose by deck size, access, and experience
- How to sand boards without making more work
- Ownership details that affect the result
- Best Sanders for Decks: Picks for Boards, Railings, and Corners
- Best picks by deck-sanding job
- What matters more than the sander’s headline power
- Typical specifications and practical trade-offs
- Choose by deck size, access, and experience
- How to sand boards without making more work
- Ownership details that affect the result
As an Amazon Associate I earn from qualifying purchases. This post may contain affiliate links at no extra cost to you.
Contents
- Best Sanders for Decks: Picks for Boards, Railings, and Corners
- Best picks by deck-sanding job
- What matters more than the sander’s headline power
- Typical specifications and practical trade-offs
- Choose by deck size, access, and experience
- How to sand boards without making more work
- Ownership details that affect the result
Best Sanders for Decks: Picks for Boards, Railings, and Corners
The best sander for deck boards is a 5-inch random-orbit sander for most homeowners; choose a 6-inch model for faster coverage on broad, flat boards, and add a detail sander or sanding sponge for railings and corners. No single handheld sander handles every deck surface equally well, so the right setup depends on how much area you have and how much trim needs attention.
Best picks by deck-sanding job
- Best all-around: 5-inch random-orbit sander. Its round pad balances coverage, control, and availability of hook-and-loop discs. It is a practical choice for typical deck boards and can reach moderately close to edges, though the pad cannot sand into square corners.
- Best for large, open decks: 6-inch random-orbit sander. The wider pad covers more area per pass, which can save time on broad, unobstructed surfaces. It is usually heavier and less nimble around posts and narrow boards.
- Best for railings and narrow sections: 1/4-sheet finishing sander. Its rectangular pad can work closer to straight edges than a round sander. It is not as quick as a larger random-orbit model for wide boards.
- Best for corners and detail work: oscillating detail sander. The pointed pad reaches inside corners and around balusters. Its small sanding area makes it a poor choice for an entire deck.
- Best for a rough, weathered surface: belt sander, used selectively. A belt sander removes material quickly, but it can gouge boards or leave dips if held still or tilted. It takes more skill than a random-orbit sander and is not the default recommendation for routine deck prep.
What matters more than the sander’s headline power
For deck work, usable control matters as much as motor power. A sander that feels manageable and maintains a steady speed is easier to guide evenly across long boards. Excessive pressure slows many sanders, increases heat, and can leave uneven patches. Let the abrasive do the work; use overlapping passes and keep the pad moving.
As an Amazon Associate we earn from qualifying purchases at no extra cost to you.


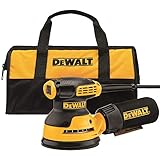
Pad size is a trade-off, not a simple “larger is better” decision. A 5-inch disc is widely available and easier to maneuver around obstacles. A 6-inch disc covers more ground, but replacement abrasives may cost more and the tool can feel bulky on narrow boards. For railings, check the actual pad shape and dimensions: a larger round pad may be less useful than a smaller rectangular one.
Dust collection is particularly valuable when sanding a large surface. Look for a dust port compatible with a shop vacuum, or a model with an effective dust bag if vacuum hookup is impractical. Collection is never perfect; wear eye protection and a properly fitted particulate respirator, and keep dust away from people, open doors, and air intakes. If old coatings may contain lead or another hazardous material, don’t dry-sand them casually: identify the coating and follow applicable safety guidance.
Typical specifications and practical trade-offs
The figures below are common ranges for these tool categories, not specifications for every model. Check the manufacturer’s current product listing before buying.
| Sander type | Typical pad | Typical tool weight | Where it excels | Main limitation |
|---|---|---|---|---|
| 5-inch random-orbit | 5-inch round disc | About 2.5–4 lb | Deck boards and general-purpose prep | Does not reach square corners |
| 6-inch random-orbit | 6-inch round disc | About 4–6 lb | Faster coverage on broad, open areas | Bulkier on narrow boards and around posts |
| 1/4-sheet finishing | About 4.5 × 4 inches | About 2–4 lb | Edges, narrow sections, and flatter finish work | Slower material removal over large areas |
| Oscillating detail | Typically 3–4 inches at its widest | About 1.5–3 lb | Inside corners and around balusters | Small pad makes whole-deck sanding inefficient |
| Belt sander | Common belt sizes include 3 × 21 inches | About 6–10 lb | Fast removal on limited, very rough areas | High risk of gouging or uneven stock removal |
Choose by deck size, access, and experience
| Your situation | Best starting choice | Why |
|---|---|---|
| Small deck, occasional maintenance | 5-inch random-orbit sander | Versatile size without buying a specialist tool for limited use |
| Large deck with long, open boards | 6-inch random-orbit sander, plus a detail tool for corners | More coverage per pass while preserving access for finish work |
| Many balusters, rails, and tight corners | 5-inch random-orbit plus detail sander or sanding sponge | Separates fast board sanding from slower, precise detail work |
| New to sanding or worried about gouges | Random-orbit sander with variable speed | More forgiving than a belt sander when kept flat and moving |
| Only a few damaged, raised areas | Hand sanding or carefully controlled random-orbit sanding | A powerful belt sander may remove too much material for small repairs |
How to sand boards without making more work
- Inspect and prepare. Replace or secure loose boards and protruding fasteners, remove dirt, and let the wood dry. Sanding wet or dirty boards can clog abrasives and produce an inconsistent surface.
- Start with a test patch. Use a fresh, reasonably fine abrasive suited to the wood and the coating-prep goal. If the surface is rough, step down only as much as needed; very coarse grit can leave scratches that show through the finish.
- Work along the grain. Keep the sander’s pad flat, guide it steadily, and overlap passes. Avoid pressing down or lingering at board ends, knots, and edges.
- Handle edges and railings separately. A round pad leaves unsanded strips near obstacles. Use a rectangular finishing sander where it fits, then hand-sand narrow edges and use a detail sander or sanding sponge for corners and profiles.
- Clean before finishing. Vacuum the surface and gaps, then follow the coating maker’s preparation instructions. Sanding dust left behind can interfere with adhesion and spoil the final appearance.
Ownership details that affect the result
Hook-and-loop discs are convenient, but dust buildup can keep them from gripping well; clean the backing pad and replace it if its hooks are worn. Abrasive discs also lose cutting ability before they look completely used. If sanding begins to take longer or the surface heats up, inspect the disc rather than adding pressure.
Empty dust bags frequently and clear the sander’s vents according to its manual. A clogged dust path can reduce collection and allow fine dust to accumulate around the pad. For a large deck, a vacuum-connected model can make cleanup easier, but check hose fit and whether the vacuum’s filtration is suitable for fine wood dust.
For most owners, a 5-inch random-orbit sander is the safest all-around purchase. Step up to 6 inches when open-board coverage is the priority, and plan on a separate detail method for railings and corners. That combination is usually more controllable—and more useful beyond one deck project—than trying to make a single aggressive tool do every job.