
What's inside
As an Amazon Associate I earn from qualifying purchases. This post may contain affiliate links at no extra cost to you.
Contents
Our Top Picks


The Short Answer
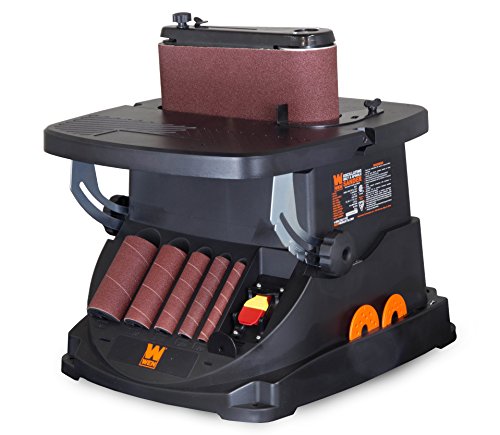
The best oscillating spindle sander is one with a flat, rigid table, a smooth and quiet motor, a good range of drum diameters, a dust port that actually works and a footprint that fits your shop. For most hobbyists, a benchtop model covers curves, scrollsaw cutouts and inside radii perfectly well. Workers who sand large or heavy parts, or who sand daily, benefit from a floor-standing machine with more mass and a larger table. Because models change constantly, this guide focuses on types and features rather than brands, and it does not quote specifications that you should verify with the manufacturer.
An oscillating spindle sander spins a sanding drum and moves it up and down at the same time. That vertical stroke spreads wear across the whole sleeve and reduces burning and scratch lines. It is the tool that makes cut curves smooth, and it replaces a lot of tedious hand sanding.
Table of Contents
- Types of Spindle Sanders
- How Oscillating Sanders Work
- How to Choose
- Key Features That Matter
- Size, Power and Space Explained
- Use Cases
- Setup and Technique
- Safety
- Maintenance
- Common Mistakes
- Who Should Choose What
- Buying Checklist
- FAQ
- Conclusion
Types of Spindle Sanders
Several designs share the same basic idea. Knowing the differences keeps you from paying for capability you will not use, or from buying a machine that cannot do the work you have.
Benchtop oscillating sanders are the most common choice for hobbyists. They sit on a bench, usually include a set of drums in several diameters and have a modest table. They are light enough to move and store, and they handle small and medium parts easily.
Floor-standing oscillating sanders have a heavier base, a larger table and often a stronger motor. The extra mass reduces vibration, and the bigger table supports larger workpieces. They take permanent floor space.
Combination machines pair a spindle with a belt, either as an oscillating spindle and edge belt together or as a spindle with an extra sanding surface. They save space and money, but you usually compromise on one function, and changing configuration takes time.
Non-oscillating spindle sanders rotate only. They are less expensive and can work for light cleanup, but they wear one strip of the sleeve and are more likely to leave scratches or burn marks.
Drill-press or lathe drum attachments turn an existing machine into a basic sander. They are an inexpensive option for occasional use, but they do not oscillate, the table is usually poor and chuck-held drums can be awkward to use safely.
| Type | Oscillation | Footprint | Stability | Best for |
|---|---|---|---|---|
| Benchtop oscillating | Yes | Small | Good for light parts | Hobby shops, curved parts |
| Floor-standing oscillating | Yes | Larger, fixed | Very good | Heavy or large parts, frequent use |
| Combination spindle and belt | Usually yes | Compact for two functions | Moderate | Tight spaces, mixed edge work |
| Rotation-only spindle | No | Small | Varies | Light cleanup on a budget |
| Drill press drum attachment | No | Uses existing tool | Depends on the press | Occasional rough shaping |
How Oscillating Sanders Work
A motor turns a vertical spindle, which holds a rubber drum covered by an abrasive sleeve. A second mechanism raises and lowers the spindle through a short stroke. The combined motion means the abrasive never rides in the same spot, so the sleeve wears more evenly, heat is spread over a larger area and the surface of the wood shows fewer horizontal scratch lines.
The drum is held by a nut at the top or in a stack of washers and a sleeve that expands when tightened. The table surrounds the drum and supports the work. Interchangeable table inserts, sometimes called throat plates, fit closely around each drum diameter to reduce the gap where the workpiece can dip. Small diameters are best for tight inside curves, while large ones are best for gentle curves and quicker removal.
How to Choose
Start with what you build. Scrollsaw work, toys, small boxes, guitar bodies, chair parts and cabinet face frames each put different demands on the sander. If you mostly work small, a benchtop unit is probably enough. If you routinely shape thick stock, long rails or large curved parts, consider a floor model.
Next, decide how often you will use it. A machine used once a week can be simple. If it runs for hours, look for sturdy construction, good dust collection and a motor that runs without strain.
Consider your available space and mobility. A benchtop machine can be stored on a shelf, but it needs a stable surface to run on, since vibration can walk it across a bench. A floor machine needs a permanent spot with clearance for long parts.
Key Features That Matter
Table
The table should be flat, stiff and smooth, with a solid connection to the base. A table that flexes under hand pressure leads to uneven sanding. Many tables can tilt for beveled work, and a tilt scale is useful if it is accurate. Check that the table locks securely at square, and use a small square to verify that it truly is square to the drum.
Drums and sleeves
A variety of diameters lets you match the drum to the curve. A set that ranges from small to large covers most needs. Sleeves are held by expanding rubber drums, and should fit snugly without slipping. Look for a system that is quick to change, since you will swap drums often.
Throat inserts
Inserts reduce the gap between the drum and table. Inserts that fit each drum closely support thin stock better and prevent chips and small parts from falling into the machine. Inserts should seat flush with the table, because a proud one catches the work.
Motor and oscillation
A smooth, quiet induction-style motor is often preferred for shop use, though many hobby machines use universal motors that are louder. Either can do the job. What matters is that the motor does not bog down in normal sanding and that the machine is not violently vibrating. The oscillation stroke should be consistent, and the mechanism should run without excessive noise or play.
Dust collection
Spindle sanders create a lot of fine dust. A port at the base or table, connected to a dust collector or a suitable vacuum, makes a major difference. Look for a design that draws air from below the table around the drum, since this captures dust at the source. A port that is too small or poorly placed will not keep up.
Also look for an easy-to-reach switch with a clear off position, and remember that a heavier base absorbs vibration; a light machine should be clamped or bolted down.
Size, Power and Space Explained
Table size determines how well you can support a workpiece. A small table is fine for small parts, but long or wide pieces will tip unless supported by your other hand or an auxiliary support. A larger table is steadier, but it needs more space, and you should be able to reach all edges of the work.
Motor power is usually stated in amps or horsepower, which are not easy to compare between models. In practice, a smaller motor is adequate for light and moderate sanding of softwoods and small hardwood parts with gentle pressure. A larger motor holds speed under heavier loads, such as thick hardwood or big drums. If you tend to push hard, you will notice a weak motor slowing, which causes burning. The better remedy is a fresh, appropriately coarse sleeve rather than more pressure.
| Drum size | Good for | Limitation |
|---|---|---|
| Small diameter | Tight inside curves, scrollsaw details | Wears faster, flexes more, removes less per pass |
| Medium diameter | General curves, chair parts, rounded corners | Cannot reach the tightest radii |
| Large diameter | Gentle curves, faster stock removal | Cannot enter tight inside corners |
Use Cases
Scrollsaw and bandsaw cleanup. A bandsaw or scrollsaw leaves marks and a slightly rough edge. The spindle sander removes the saw marks and brings the edge to the layout line, often leaving a surface ready for light hand sanding.
Chair and furniture parts. Curved legs, arms and rails demand smooth, even curves. A spindle sander lets you sand a template-cut curve consistently.
Inside radii and cutouts. Handle cutouts, inside corners of cabinet doors and decorative openings are ideal for a small drum.
Template shaping. Rough-cut pieces can be sanded to a pattern. Some woodworkers clamp a template to the work and use a sanding drum with a bearing guide or follow a guide collar insert to copy the template.
Toys, boxes and crafts. Small round parts and rounded corners are a perfect fit.
Setup and Technique
Place the machine on a stable surface, or bolt it down, and verify that the table is square to the drum with a small square. Choose the largest drum that fits the curve, since larger drums remove material more smoothly and last longer.
Install the sleeve with the machine unplugged. Slide it over the rubber drum, add the washers and tighten the nut so the drum expands and grips the sleeve. Do not overtighten. Fit the insert that matches the drum with the smallest gap.
Begin with a grit appropriate for the job. A medium grit works for removing saw marks, and finer grits for finishing. Work through grits in order without skipping several steps, since a coarse scratch left behind will show under finish.
Feed the work against the rotation of the drum. The drum turns in one direction, so push the work into the side where the drum rotates toward you, as the owner’s manual indicates, rather than away. Use light, steady pressure. Keep the work moving so you do not dig a flat spot or burn one area. Let the sleeve do the work. If you push hard, the wood heats and the sleeve glazes quickly.
Sand to the line, not past it. If the work is nearly to the line, use a smaller pass. Hold the work flat on the table, and use the full height of the sleeve so wear is spread out. For convex curves, rotate the piece steadily. For concave curves, choose a drum smaller than the curve and keep the work moving along it.
Safety
- Wear safety glasses and a respirator suited to fine dust. Wood dust is a respiratory hazard, and some species can cause sensitization or allergic reactions.
- Connect dust collection every time, and empty containers regularly. Do not allow fine dust to pile up in or around the machine.
- Wear hearing protection when the machine is loud.
- Unplug the sander before changing sleeves, drums or inserts.
- Keep fingers clear of the drum, especially on small parts. Use push blocks, jigs or holders.
- Feed against the rotation so the drum does not grab and pull the work.
- Avoid loose clothing, gloves, jewelry and dangling hair near the rotating drum.
- Do not sand material that you are not sure about, such as treated or painted lumber of unknown age, without understanding the hazards. Old paint may contain lead, and the dust from some treated materials is hazardous.
- Keep the table insert in place so a workpiece cannot jam in the opening.
Maintenance
Replace sleeves when they glaze or tear, instead of pushing harder. A resin eraser stick or crepe-type cleaner can extend the life of a sleeve by removing pitch and buildup, which is especially helpful on sticky woods.
Inspect the rubber drums for cracks, glazing or loss of expansion. Keep drums and the table free of dust. Check that the nut and washers are tight and that the spindle runs true. A visible wobble means a bent spindle or a worn part.
Clean the dust port and hose to maintain airflow. Look at the oscillation mechanism, and lubricate it only according to the manufacturer’s instructions. Do not oil or grease parts that the manual says should stay dry. Wipe the table and check that it remains flat and free of rust. Store sleeves flat and dry, since humidity and folding damage them.
Common Mistakes
- Choosing too small a drum and sanding flats into a gentle curve.
- Pressing hard instead of changing to a fresh or coarser sleeve.
- Holding the work still, which burns the wood and leaves a flat.
- Skipping grits and leaving coarse scratches for the finish to reveal.
- Forgetting to use the full sleeve height, so one band wears out early.
- Using a mismatched insert with a big gap around the drum.
- Skipping dust collection and breathing the dust.
- Sanding small parts by hand-holding them against the drum.
- Overtightening the drum nut, which can distort the drum or tear the sleeve.
- Expecting a spindle sander to flatten surfaces. It is a shaping tool for edges and curves.
Who Should Choose What
| If you are… | Consider | Watch out for |
|---|---|---|
| A scrollsaw or craft hobbyist | Benchtop oscillating sander with a full drum set | Clamp it down and keep dust collection connected |
| A furniture builder with curved parts | Benchtop with a large table, or a floor model | Table size and stability |
| A professional or daily user | Floor-standing oscillating machine | Space, motor strength, dust capture |
| Short on space | Combination spindle and belt | Compromised performance in one function |
| Rarely sanding curves | Drum attachment or hand sanding | Limited control and no oscillation |
If you are comparing options, you can browse oscillating spindle sanders, find replacement sanding sleeves, and consider a respirator for fine dust.
Buying Checklist
- List the curves and part sizes you work with most often.
- Check that the drum set covers your tightest and gentlest curves.
- Confirm that inserts are included for each drum size.
- Verify that the table is flat, locks securely and squares to the drum.
- Look for a dust port that connects to your vacuum or collector.
- Check that replacement sleeves are widely available in standard sizes.
- Consider weight and whether you will bolt or clamp the machine.
- Check that the switch is easy to reach and clearly marked.
- Read the warranty and the manufacturer’s safety instructions.
- Budget for sleeves in several grits and a respirator.
FAQ
What does oscillating mean on a spindle sander?
The spindle moves up and down as it rotates. This spreads wear over the sleeve, lowers heat and reduces scratch lines.
Is a benchtop spindle sander enough?
For most hobby work, yes. It handles small and medium parts. A floor model suits large parts and daily use.
How is a spindle sander different from a belt sander?
A spindle sander is for curves and inside radii. A belt sander is better at flat surfaces and straight edges. Many shops use both.
Which grit should I start with?
Choose a grit that removes saw marks without gouging, often a medium grit, then progress to finer ones without skipping many steps.
Why does my wood burn?
Common causes are a glazed sleeve, too much pressure, keeping the work still or a worn drum. Switch to a fresh sleeve and keep the work moving.
Can I sand plastics and metal?
Some plastics can be sanded with light pressure. Metals generally should not be sanded on a wood machine, since sparks can ignite dust. Check the manual.
How do I control dust?
Use the built-in port with a vacuum or collector and wear a respirator. Empty the container before it overflows.
How long do sleeves last?
It depends on grit, wood and pressure. Replace them when they stop cutting. Resin-heavy woods clog them faster.
Conclusion
The best oscillating spindle sander fits your work: a flat table, a good set of drums and inserts, smooth operation and effective dust collection. Choose benchtop for most hobby work and floor-standing for heavy daily use, and match drum size to the curve you are sanding.
Use fresh sleeves, light pressure, steady movement and a respirator, and your curved parts will come out smooth. When ready, you can look at sanding drum sets to expand your range.
Disclosure: As an Amazon Associate, we earn from qualifying purchases. If you click an affiliate link and buy, we may earn a small commission at no extra cost to you.
Related guides
More from Amazon
Programs that pair well with the guide above. Offers and eligibility are set by Amazon and may change.
A free business account with business pricing and bulk-buying tools for work, shop or home office.
Create a business accountFree shipping on eligible items, Prime Video and more. Eligible new members can start with a free trial.
Start a Prime free trialAudiobooks and podcasts to listen to on the go. Eligible new members can start with a free trial.
Try Audible freeAd-free music streaming. Eligible new subscribers can start with a free trial.
Try Music Unlimited freeAs an Amazon Associate we earn from qualifying purchases.


Write Your Review
No reviews yet. Be the first to share your experience!