
What's inside
As an Amazon Associate I earn from qualifying purchases. This post may contain affiliate links at no extra cost to you.
The short answer: the best marking gauge is a solid, easy-to-lock tool with a crisp cutting wheel or knife, a beam that slides smoothly and a fence that stays square. A single wheel gauge is the most useful first purchase, because it scribes a clean line across the grain and along it. A second gauge with a pin or a double-pin head is handy for mortises and tenons. Fancy materials matter less than a fence that does not rock, a lock that does not creep and a marking edge you can keep sharp.
This guide compares gauge designs rather than naming winners. It covers why a gauge beats a pencil for joinery, how the main types behave, what to look for in the fence, beam and lock, how to set and use one accurately, and how to avoid the errors that produce loose joints. Check current specifications and manufacturer instructions on any listing before you buy.
Contents
Our Top Picks
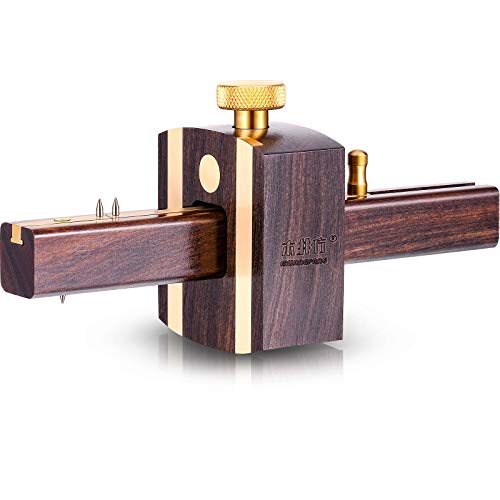 Mortise Gauge Woodworking Marking Gauge Ebony Mortise Square1 Count (Pack of 1)0.74 poundsCheck on Amazon


Contents
- Why use a gauge instead of a pencil
- Types of marking gauges
- Anatomy: beam, fence, lock and marker
- Comparison table
- Choosing by project type
- Using a gauge accurately
- Safety notes
- Care and tuning
- Buyer checklist
- Mistakes to avoid
- Frequently asked questions
- Bottom line
Why use a gauge instead of a pencil
A pencil line has width. Even a sharp point leaves a mark that is thick enough to hide a small error, and the lead drifts when it meets uneven grain. A marking gauge replaces that fuzzy line with a fine incision. The marker is held at a fixed distance from a reference face by the fence, so every line you make is parallel to the edge you ran the fence along. Repeat the same setting around a board and the lines meet exactly.
The most important benefit is not accuracy alone. A scored line gives a chisel or a saw something to register against. A chisel edge drops into the scribed groove and stops, which makes it far easier to pare to a line than to chase a pencil mark. Because the incision severs surface fibers, it also reduces tear-out where the blade exits at the shoulder of a joint.
Types of marking gauges
Pin gauges
The traditional gauge has a small steel pin fixed in the beam. It is inexpensive and simple, and it is often shaped so the pin tip drags a line rather than slicing. A pin tends to follow grain, which can make it wander on figured or open-grained wood, and it can tear fibers when marking across the grain. It remains fine for rough layout, softer woods and marking along the grain, particularly when the pin is filed to a point or a knife-like edge.
Wheel or cutting-wheel gauges
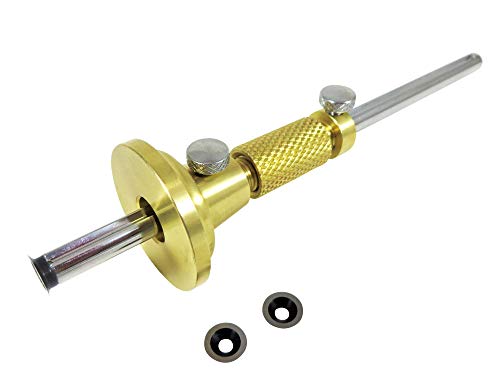
A wheel gauge uses a small disc with a sharpened edge instead of a pin. The wheel rolls through the wood, slicing fibers cleanly in either direction, so it produces a crisp line across or along the grain with little tear-out and little effort. Many woodworkers regard a wheel gauge as the best general joinery gauge. The wheel is replaceable or can be re-honed, and a light touch is all it takes. The wheel usually sits slightly offset so it cuts on one side only, which keeps the line right at the reference.
Cutting gauges with a knife blade
A cutting gauge replaces the pin with a small flat blade held by a wedge or a screw. It works like a wheel gauge in that it severs fibers cleanly, and a blade can be re-sharpened in the usual way. A knife blade can be set so the bevel faces the fence, which pulls the gauge toward the reference edge and helps it track straight. Cutting gauges are well suited to thin stock and veneer.
Mortise gauges
A mortise gauge carries two pins or blades that can be spaced to match the width of a mortise or tenon. One pin is typically fixed and the other slides on a secondary bar, controlled by a thumbscrew or an adjusting knob on the end of the beam. This lets you mark both sides of a mortise in a single pass, so the walls are exactly parallel. Because it scribes two lines, a mortise gauge is a major time-saver whenever you cut many joints.
Combination and digital tools
Combination gauges that carry a ruler, a square and a gauge head can be handy for quick work. Digital readouts are available on some precision tools, but they bring batteries and fragility, and most joinery does not require that level of numerical precision. Where a display is offered, make sure you can still lock the setting and use it without power.
Anatomy: beam, fence, lock and marker
The beam
The beam, also called the stem, slides through the fence. A beam with a scale printed or engraved along it speeds setup, though the scale is a convenience only. For accuracy you will still set the distance against a rule or a mating piece. A beam should be straight and smooth, and it should slide without wobble. Hardwood beams are common and comfortable, and metal beams are stiffer and stable.
The fence
The fence, or head, rides against the reference edge. It should be flat and square to the beam, and large enough to rest firmly on the board without tipping. A fence that is slightly convex or warped will make the mark vary with the angle of your hand. Brass facing on the fence reduces wear on a wooden head. A rounded fence can help you follow slightly curved edges, while a flat one gives better registration on straight stock.
The locking mechanism
The lock is where many inexpensive gauges fail. A thumbscrew that bites the beam needs to hold the setting under moderate pressure without slipping. Wedge locks are simple and quick, while screw locks provide finer control. Wedges can loosen with humidity changes in wooden parts. Some gauges include a micro-adjust wheel that moves the beam a tiny amount, which helps when you need to creep up on an exact setting. A lock that loosens mid-cut is worse than having no gauge at all, because you will not notice the error until the joint fails.
The marker
Whether pin, wheel or blade, the marker should be sharp, hold its edge and be easy to adjust or replace. Look for a design where the marker position can be set to project a small and consistent distance from the beam. Too much projection makes the gauge hard to control and encourages the beam to rock. If the listing offers spare wheels or pins, that is a sign the maker expects the gauge to see regular use.
Comparison table
| Type | Best use | Strength | Limitation |
|---|---|---|---|
| Pin gauge | Rough layout, marking along the grain | Simple and affordable | Can tear or wander across grain |
| Wheel gauge | Dovetails, shoulders, general joinery | Clean line in any direction | Needs a light touch; wheel must be kept sharp |
| Knife-blade cutting gauge | Thin stock, veneer, fine layout | Crisp cut; blade can be sharpened | Takes practice to set the bevel |
| Mortise gauge | Mortise and tenon joints | Two parallel lines in one pass | More parts to adjust; heavier to set up |
Many shops settle into a pair: a wheel marking gauge for dovetails and shoulders and a double-pin mortise gauge for frame joints. If you work with thin stock or veneer, a knife-style cutting gauge is worth a look.
Choosing by project type
Dovetails and box joints
You need a gauge that marks the baseline cleanly around all faces of a board. A wheel gauge or a cutting gauge is the usual choice, because the line has to be sharp enough to accept a chisel edge. The setting is generally taken from the thickness of the mating piece, so a fence that does not tilt matters.
Frame and mortise work
A mortise gauge is the obvious tool. Set the pins to the width of your chisel or the thickness of the tenon, then run the fence along the reference face. Mark from the same face on every piece in a set, because slight variations in thickness are canceled when every piece is referenced to the same side.
Hinges, rebates and lap joints
Here depth lines matter. A gauge lets you mark the depth of a hinge mortise or the shoulder of a half-lap before you cut. A quick-adjusting gauge with a smooth lock lets you change settings frequently without losing accuracy.
Thin stock and veneer
Use a blade-style cutting gauge. Several light passes severing the fibers produce a clean line, whereas a pin tends to crush thin material.
Using a gauge accurately
Set the distance by holding the beam against a rule or a reference piece, and check the setting from the fence face to the marker with a good rule or a square before you scribe. If your gauge has a lock that tends to nudge the beam when tightened, tighten it, then re-check the distance. For critical work, scribe a test line on scrap and measure it.
Hold the fence firmly against the reference edge and tilt the gauge slightly so the marker leans in the direction of travel. Push or pull, depending on the type, with light pressure at first. Several light passes cut a cleaner line than one heavy pass, and you can deepen the mark by repeating the stroke rather than pressing harder. Keep the fence tight against the board throughout, particularly at the start and end, where it is easy to let the head drift off the face.
When marking across the grain, take a gentle first pass to establish a shallow groove, then repeat. When the line crosses harder and softer areas, such as earlywood and latewood, the gauge can deflect, so lighter passes help it stay on track. If a line is hard to see, rub a pencil or chalk across it to highlight the groove.
Safety notes
- Marking edges are sharp. Wheels, knives and pins can puncture or slice skin, so keep your free hand clear of the path and never point the marker toward your body.
- Secure the workpiece with a clamp or a stop, particularly when scribing smaller parts. A piece that slides under a pulled gauge can cause the marker to jump.
- Retract or cover the marker when the gauge is not in use. Many designs let you lower the marker flush or flip the head, and a simple cap or a block of wood protects both you and the edge.
- Take care when changing or sharpening a wheel or blade. Small parts are easy to drop and hard to hold, so work over a bench with good light.
- Do not use a gauge as a pry bar or a scraper. A bent beam or a loosened head will lead to inaccurate lines and possible injury.
- Always read the manufacturer instructions and check the current specifications before use.
Care and tuning
A good gauge improves with a bit of tuning. Check that the fence face is flat by laying it against a reference surface and looking for light under the edge. Rub a little wax along the beam so it slides smoothly, but keep wax away from the locking surfaces. Keep the marker sharp: a wheel can be touched up with a fine abrasive on its bevel, and a blade can be honed on a stone. A dull marker tears fibers and encourages you to push harder, which makes the gauge wander.
Store the tool where the beam will not bend or the head will not be knocked. Wooden gauges respond to humidity, so avoid leaving them in a damp garage or beside a heater. If a screw or wedge lock begins to slip, inspect it for worn threads, debris or a flattened wedge, and consult the maker for replacement parts.
Buyer checklist
- Decide what you will mark most: dovetail baselines, mortises, thin stock or general layout.
- Pick a wheel or cutting marker for clean lines in any direction.
- Choose a mortise gauge only if you cut frame joints regularly.
- Inspect the fence description for flatness, squareness and material.
- Check that the lock grips the beam firmly without needing excessive force.
- Look for a smooth, wobble-free beam with a clear scale if you value quick setup.
- Confirm that spare wheels, blades or pins are available.
- Think about size: a very long beam is cumbersome, while a very short one limits reach.
- Check whether the marker can be retracted or protected.
- Read recent feedback for comments on slipping locks and fence alignment, and verify current specifications.
Mistakes to avoid
- Trusting the printed scale blindly. Set critical dimensions against a rule or the mating part, then confirm with a test mark.
- Pressing hard on the first pass. Heavy force tears fibers and makes the gauge dive along the grain. Build the line gradually.
- Letting the fence lift. Even a small gap at the start or end changes the line and ruins the reference.
- Marking from different faces. Always scribe from the same reference face on parts that must mate.
- Over-tightening the lock. It can mar the beam or strip threads. Tighten just enough to hold.
- Using a dull marker. A blunt wheel or pin crushes wood instead of cutting it.
- Buying a mortise gauge first. Unless you are cutting mortises, a single wheel gauge will serve better.
- Storing it with the marker exposed. The edge dulls, and the next reach into a drawer can end badly.
Frequently asked questions
What is the best marking gauge for a beginner?
A wheel gauge with a firm lock and a flat fence is a sound starting point. It makes clean lines across and along the grain and suits dovetails, shoulders and general layout.
What is the difference between a marking gauge and a mortise gauge?
A marking gauge scribes one line. A mortise gauge carries two markers set at an adjustable distance, so it can scribe both sides of a mortise or tenon in a single pass.
Are wheel gauges better than pin gauges?
For most joinery, a wheel produces a cleaner line with less tear-out, especially across the grain. A pin can still be adequate for rough layout or softer woods.
How do I stop my gauge from wandering with the grain?
Use light passes, lean the gauge in the direction of travel, keep the marker sharp and press the fence firmly against the reference edge. A wheel or knife tracks better than a blunt pin.
Why does my gauge setting slip?
The lock may be loose, the beam may be worn or dirty, or the thumbscrew may be damaged. Clean the parts, tighten gently and check for replacement parts if the problem persists.
Can a marking gauge replace a ruler or a square?
No. It transfers a measurement from an edge, but you still need a rule to set it and a square to check results.
How do I sharpen the wheel?
Follow the maker instructions. Typically you hone the bevel lightly with a fine abrasive, keeping the angle consistent, or fit a replacement wheel if the edge is worn.
Is a digital marking gauge worth it?
It can be convenient for repeatable settings, but it adds electronics and cost. For most hand-tool joinery, a mechanical gauge with a reliable lock is sufficient.
Bottom line
Begin with one well-made wheel gauge, learn to set it against your work rather than the printed scale, and keep the marker sharp. Add a mortise gauge when frame joints become a regular habit. Pair your gauge with a good marking knife and a reliable square, and always confirm current specifications and manufacturer instructions before buying or using any layout tool.
Disclosure: As an Amazon Associate, we earn from qualifying purchases. Links marked as sponsored may earn us a commission at no extra cost to you.
Related guides
More from Amazon
Programs that pair well with the guide above. Offers and eligibility are set by Amazon and may change.
A free business account with business pricing and bulk-buying tools for work, shop or home office.
Create a business accountFree shipping on eligible items, Prime Video and more. Eligible new members can start with a free trial.
Start a Prime free trialAudiobooks and podcasts to listen to on the go. Eligible new members can start with a free trial.
Try Audible freeAd-free music streaming. Eligible new subscribers can start with a free trial.
Try Music Unlimited freeAs an Amazon Associate we earn from qualifying purchases.
Write Your Review
No reviews yet. Be the first to share your experience!