Best Magnifying Desk Lamps
What's inside
- Best magnifying desk lamps by situation
- What magnification strength actually means
- Lens diameter: field of view versus portability
- Lighting: color temperature and brightness control
- Arm stability is the difference between useful and frustrating
- Compact recommendations for different buyers
- A quick desk-footprint calculation
- Setup and maintenance that extend lamp life
- Final buying decision
- Best magnifying desk lamps by situation
- What magnification strength actually means
- Lens diameter: field of view versus portability
- Lighting: color temperature and brightness control
- Arm stability is the difference between useful and frustrating
- Compact recommendations for different buyers
- A quick desk-footprint calculation
- Setup and maintenance that extend lamp life
- Final buying decision
As an Amazon Associate I earn from qualifying purchases. This post may contain affiliate links at no extra cost to you.
The best magnifying desk lamp for detailed bench work is a stable 3–5 diopter LED lamp with a lens at least 4 inches wide, dimming, a neutral-to-daylight color setting, and an arm that stays put when you reposition it.
For woodworking, the right lamp is not necessarily the one with the strongest magnification. A very powerful lens gives a smaller viewing area and a shorter working distance, while a broad, evenly lit lens lets you inspect joinery, carve small details, apply finish, and read a ruler without constantly moving your head or hands.
As an Amazon Associate we earn from qualifying purchases at no extra cost to you.


Contents
- Best magnifying desk lamps by situation
- What magnification strength actually means
- Lens diameter: field of view versus portability
- Lighting: color temperature and brightness control
- Arm stability is the difference between useful and frustrating
- Compact recommendations for different buyers
- A quick desk-footprint calculation
- Setup and maintenance that extend lamp life
- Final buying decision
Best magnifying desk lamps by situation
| Best for | Recommended specification | Why it fits | Typical market range |
|---|---|---|---|
| Occasional detail work | 3 diopters, 4–5 in lens, 800–1,200 lumens | Useful magnification without making setup fussy | $35–$75 |
| Frequent carving and inlay | 3–5 diopters, 5–6 in glass or acrylic lens, dimming, metal swing arm | Balances viewing area, reach, and control | $75–$180 |
| Very small components | 5 diopters or a 3-diopter lens with a 5x insert, 4–5 in lens | Higher detail resolution for tiny cuts and hardware | $50–$160 |
| Shared or shallow workbench | Clamp base, 3–4 in lens, 18–24 in arm reach | Preserves desk area and stores against the bench | $45–$130 |
| Maximum stability | Weighted base of 5–8 lb, 4–6 in lens, articulated arm | Less vibration when pressing a tool or brush against the work | $90–$220 |
What magnification strength actually means
Magnifying lamps usually specify lens power in diopters rather than simply saying “2x” or “5x.” The approximate focal distance is calculated as 100 divided by the diopter rating in centimeters. A 3-diopter lens focuses at about 33 cm, or 13 inches, while a 5-diopter lens focuses at about 20 cm, or 8 inches.
That working distance matters at a bench. A 3-diopter lamp leaves enough room for a carving knife, scribe, or small screwdriver. A 5-diopter lens makes tiny defects easier to see but forces your hands and the workpiece closer to the lens. High-power inserts, often around 8–10 diopters, are best reserved for occasional inspection rather than general woodworking.
For most users, 3 diopters is the safest starting point. Choose 5 diopters if you routinely work on miniature components, fine inlay, small clock parts, or intricate carving. A model with a removable high-power insert is more flexible than a lamp whose entire lens has excessive magnification.
Lens diameter: field of view versus portability
A lens under 3 inches is easy to pack but makes you chase the work. A 4-inch lens is a practical minimum for detail work, and a 5- or 6-inch lens is more comfortable for inspecting a larger area of a joint or finish surface.
Glass lenses generally resist scratching and remain clearer over years, but they add weight. Acrylic lenses make a lighter arm possible and are less dangerous if dropped, although they scratch more readily. Whichever material you choose, avoid wiping the lens with a dry shop towel: trapped sawdust can act like abrasive. Blow or brush off particles first, then use lens cleaner and a clean microfiber cloth.
Lighting: color temperature and brightness control
A fixed “daylight” lamp around 5,000–6,500 K can make pencil lines and surface defects easy to distinguish, but it may look harsh during long sessions. A neutral setting around 4,000–5,000 K is usually more comfortable for general bench work. If the lamp offers selectable color temperature, use a neutral setting while shaping and a cooler setting when inspecting fine scratches or contrast.
Brightness is just as important as color. Look for continuous dimming rather than only two or three preset levels. A useful range is roughly 20% to 100% output. Full brightness helps with inspection, while a lower setting reduces reflections from varnish, polished metal, or glossy glue.
Do not judge a lamp by lumen figures alone. A narrow lens with concentrated LEDs can produce glare even at modest output. LEDs arranged around the lens or behind a diffusing panel usually give more even illumination. A color-rendering index of 90 or higher is desirable when matching stains, oils, shellac, or painted surfaces.
Arm stability is the difference between useful and frustrating
The most common failure in inexpensive magnifying lamps is not the LED module; it is the arm. A spring arm that slowly sags, a loose hinge, or a clamp that twists under load can turn a good lens into a nuisance.
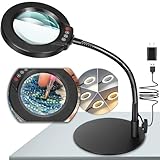
- Weighted bases: Choose a base of about 5–8 lb for a large lens or long arm. The footprint is larger, but repositioning is quick.
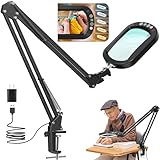
- Desk clamps: A clamp saves space and is preferable when the bench edge is accessible. Check that it opens wide enough for your benchtop and has a padded jaw.
- Friction hinges: These are compact and clean-looking, but they need enough resistance to hold the lens without requiring excessive force.
- Spring-balanced arms: They offer long reach and easy movement. Exposed springs can collect dust, so they need occasional cleaning.
- Goosenecks: They are convenient for short lamps, but long goosenecks tend to vibrate and drift when supporting a heavy lens.
For hand-tool work, a metal parallel-arm design is usually the best compromise. A flexible arm may be adequate for reading or soldering but can move whenever you touch the bench.
Compact recommendations for different buyers
Best budget choice: a 3-diopter clamp lamp
A basic LED clamp lamp with a 4-inch lens, three brightness levels, and a 3-diopter main lens is the sensible low-cost choice. It provides enough enlargement for layout marks, small hardware, and finish inspection without taking over the bench. Expect less refined hinges and fewer lighting adjustments than on premium models, so inspect the clamp and arm before buying.
Best all-round choice: a dimmable 3–5 diopter swing-arm lamp
For regular woodworking, choose a 5-inch lens, continuous dimming, a metal articulated arm, and either neutral white light or selectable color temperature. A removable 5x insert is useful, but the main lens should remain moderate in power. This configuration works for carving, model making, inlay, electronics-style repair, and detailed finishing.
Best for maximum detail: a high-power inspection lamp with auxiliary lens
If your work regularly involves tiny pins, miniature hinges, small carving cuts, or very fine lettering, choose a lamp with a 5-diopter main lens and a stronger auxiliary insert. Use the insert only for short inspection periods. It narrows the field of view and makes hand positioning more demanding.
Best for a crowded bench: a clamp-mounted lamp with a folding arm
A folding arm with a 3- or 4-inch lens is the most practical option when the lamp must be removed after every session. Measure the clamp depth, cable route, and clearance above the bench before ordering. A lamp that occupies 2 inches of edge space can still be unusable if its folded arm blocks a drawer or tool rack.
A quick desk-footprint calculation
Suppose a weighted lamp has a 7-by-8-inch base. Its footprint is 56 square inches. On a 24-by-48-inch bench, which has 1,152 square inches of surface area, the base consumes about 4.9% of the top. A clamp-mounted version may occupy only a narrow 2-inch strip along the edge, but it also needs an unobstructed edge and may interfere with a vise or bench dog.
Use a weighted base when you move the lamp between several positions during a project. Use a clamp when the lamp stays in one zone and every square inch matters.
Setup and maintenance that extend lamp life
- Place the lamp to one side and slightly forward. This reduces shadows from your hand and keeps the lens out of the direct path of flying chips.
- Set the lens nearly perpendicular to the work. Angling it too far increases distortion and reflections.
- Adjust the workpiece before increasing magnification. Better positioning often solves visibility problems without sacrificing working distance.
- Keep dust away from hinges and vents. Brush the arm and base after each session; compressed air can force dust deeper into switches and bearings.
- Clean the lens correctly. Remove grit first, then use a suitable lens cleaner and microfiber cloth. Never use abrasive polish.
- Check fasteners periodically. Tighten hinge screws and clamp hardware gently. Over-tightening can damage threads or make the arm bind.
The parts most likely to wear are hinge friction washers, clamp pads, power switches, and the lens surface. LEDs usually last longer than the mechanical arm, but an integrated LED module can make repair difficult. If long-term serviceability matters, favor a lamp with replaceable hardware, a standard power adapter, and a lens held in a separate bezel.
Final buying decision
Choose a 3-diopter, 4–5-inch LED lamp if you want one tool for general bench work. Move to 5 diopters when small details dominate your projects, and prioritize a broad lens over extreme magnification. For a permanent station, buy the heaviest stable arm your budget and bench can accommodate; for a shared workspace, choose a padded clamp and folding arm. In every case, continuous dimming, even light, and mechanical stability will improve detailed work more than a larger advertised magnification number.