Best Edge Banding Tools for Beginners
What's inside
As an Amazon Associate I earn from qualifying purchases. This post may contain affiliate links at no extra cost to you.
Contents
Best Edge Banding Tools for Beginners
The best edge banding tools for beginners are a low-heat adjustable iron, a sharp flush-trim tool, a fine file, and a soft sanding block; add a powered trimmer only if you band panels often. This setup is easier to control than a full-size edgebander and helps prevent the two common beginner mistakes: cutting into the plywood face and rounding MDF edges unevenly.
Choose tools by how much banding you’ll do
| Situation | Good starting choice | Why it fits | Typical general-market cost |
|---|---|---|---|
| One small project, limited budget | Household iron with temperature control, utility knife, fine file, sanding block | Uses tools you may already own; slow enough to learn on scraps | $20–$60 for missing basics |
| Several cabinets or shelves | Dedicated edge-banding iron, double-sided edge trimmer, file | More consistent heat and faster trimming across repeated edges | $50–$150 |
| Frequent shop use | Powered flush trimmer plus manual scraper and sanding block | Reduces repetitive trimming time; manual tools still handle corners and cleanup | $100–$300 or more |
These are broad tool-only ranges, not quotes; prices vary by construction and included accessories. The banding itself, replacement blades, and any dust collection are additional costs.
As an Amazon Associate we earn from qualifying purchases at no extra cost to you.


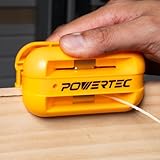
The beginner tool lineup
1. Heat source: adjustable iron or edge-banding iron
Most iron-on veneer and pre-glued edge banding can be applied with a household iron that has adjustable temperature. A purpose-made edge-banding iron is narrower and easier to guide along a panel edge, but it is not essential for occasional work. Check the banding manufacturer’s instructions: materials and adhesives differ, so there is no single safe temperature for every roll.
Start at a moderate setting and test on an offcut of the same panel. Move steadily, press the banding down through a scrap block or roller, and make sure the adhesive reaches the edges. Excessive heat can scorch veneer, soften nearby glue lines, or distort thin banding; too little heat leaves loose spots.
2. Trimming: double-sided edge trimmer
A manual double-sided trimmer cuts the overhang from both faces of a banded edge. It is inexpensive, needs no setup, and gives a beginner more control than a router. Look for replaceable blades and a body that stays square to the panel. Keep the tool clean: adhesive buildup or a dull blade can tear veneer rather than slice it.
Trim only after the adhesive has cooled and set. Work in short, controlled passes, keeping the base flat against the panel. If the trimmer catches, stop and inspect the blade and direction rather than forcing it. A sharp utility knife can handle short cuts, but it demands careful support and is easier to steer into the panel face.
3. Fine adjustment: file or edge scraper
A fine file or purpose-made edge scraper removes the tiny remaining lip and levels small imperfections. A scraper can leave a cleaner edge with less risk of sanding through thin veneer, while a fine file is easy to find and inexpensive. Use light strokes along the edge, not across the panel face. At corners, ease the sharpness minimally; aggressive rounding makes the banding look inconsistent.
4. Finish: sanding block and fine abrasive
A flat sanding block helps blend the edge without dipping into the panel. Use fine abrasive—often around 180–220 grit for final smoothing—and sand the edge, not the face veneer. Wrap abrasive around a firm block rather than using fingertips, which tend to create a hollow or rounded spot. MDF dust is fine and irritating, so use dust extraction or a suitable dust mask and avoid blowing dust around the shop.
Manual vs. powered trimming
| Tool type | Typical working range | Best for | Beginner trade-off |
|---|---|---|---|
| Manual double-sided trimmer | Commonly handles banding overhangs up to about 3 mm per face; verify the tool’s stated capacity | Occasional panels and learning controlled cuts | Slower, but inexpensive and less likely to remove material too quickly |
| Powered edge trimmer | Capacity depends on cutter and fence; many are set up for thin veneer or plastic banding | Repeated, longer edges | Fast, but can gouge the face if depth, fence, or feed is wrong |
| Router with flush-trim bit | Bit length and bearing determine usable edge thickness | Shop users who already own a router and can control it safely | Versatile, but easy to tip or cut into the panel; not the simplest first purchase |
Capacities are representative rather than universal: confirm the specific tool’s manual, especially for thicker PVC or ABS banding. A powered tool saves time only after it is set up correctly. For a first project, a manual trimmer is usually the more forgiving choice.
What to buy for your work style
- One-off shelves or a small desk: Use an adjustable iron, manual trimmer, fine file, and sanding block. Practice on a short offcut before touching a finished panel.
- Several panels per month: Upgrade to a dedicated iron and a quality trimmer with replaceable blades. The consistent tool geometry is more useful than buying a powered cutter immediately.
- Long production runs: Consider a powered trimmer with an adjustable fence, plus a manual scraper for corners and touch-ups. Choose dust collection and accessible replacement cutters if available.
- Very thin veneer or costly face material: Favor light manual trimming and scraping. Avoid a router until you can make repeatable test cuts without the bearing or base wandering.
A safe, repeatable setup for a first panel
- Prepare the edge. Cut it square and remove loose fibers. A rough or out-of-square edge can leave gaps that trimming cannot fix.
- Cut banding slightly long. Leave a small overhang at each end so the edge remains covered after positioning. Keep the strip centered over the panel edge.
- Heat and bond in sections. Follow the adhesive instructions, moving the iron steadily. Press the heated strip firmly with a roller or a smooth scrap block, especially along both long edges.
- Let it cool, then check adhesion. If an edge lifts, reheat and press it before trimming. Cutting a loose strip can pull it away from the panel.
- Trim gradually. Keep the manual trimmer square and make controlled passes. Stop if the tool chatters, tears fibers, or exposes the substrate.
- Scrape and sand lightly. Remove the remaining lip with a fine file or scraper, then smooth the edge with a flat block. Check the face under good light before repeating the process on the next panel.
Ownership details that matter
Blades and cutters are the parts most likely to affect results over time. A dull blade takes more force and increases the chance of tearing veneer or slipping into the panel. Replace or sharpen cutters as their manufacturer recommends; do not compensate for dullness by pressing harder. Clean adhesive residue from the iron while it is unplugged and cool, using a method approved for its surface. Keep abrasives and trimmer blades free of glue and dust.
For a beginner, a reliable manual setup is usually the best value: it costs less, stores easily, and makes mistakes visible before they become large. Buy powered trimming for repeated work, not simply because it looks faster. In either case, the most important “tool” is a same-material offcut for dialing in heat, pressure, and trimming technique before working on the finished panel.


