Best Drill Press Tables with Fences for Repeatable Dowel Hole Placement
What's inside
As an Amazon Associate I earn from qualifying purchases. This post may contain affiliate links at no extra cost to you.
Contents
Why dowel joints demand a fenced table
A stock drill press table is round, small, and has no reference edge. You can drill a single hole accurately, but you cannot put the next hole in the exact same place on 20 identical parts without measuring each one. For dowel joinery that error stacks. If you are off by 1/64″ (0.4mm) on each hole, a four-dowel edge joint ends up 1/16″ out of alignment and won’t close without forcing.
A drill press table with a fence solves this by giving you two fixed references: the fence controls distance from the edge, and a stop block controls distance from the end. Once you lock both, every part hits the same coordinates. You are not measuring, you are registering. That is the only way to get repeatable dowel placement without a dedicated doweling jig.
As an Amazon Associate we earn from qualifying purchases at no extra cost to you.
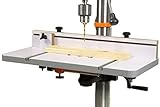

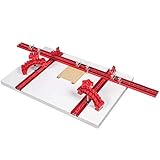
What actually matters for repeatability
Ignore marketing about dust ports and storage drawers. For dowels, these four things determine whether a table holds tolerance:
1. Fence straightness and rigidity. Extruded aluminum T-track fences are the standard because they stay straight. A fence made from two layers of MDF will work if it is braced, but a single 3/4″ MDF fence will flex 0.010″ to 0.020″ when you push stock against it. That flex goes directly into your hole position. Look for a fence at least 2-1/2″ tall with a full-length aluminum track on the face and a back brace or L-bracket every 8-10 inches.
2. Fence adjustment. You need micro-adjustable, square-to-table movement. The best systems use two T-bolts through slots in the table so the fence slides parallel to the bit. If the fence pivots on one bolt and clamps on the other, you will fight squareness every time you move it. Check that you can lock the fence at both ends without it racking.
3. Stop block with positive lock. A flip stop on a T-track is far more repeatable than a clamp-on block of wood. A good flip stop repeats within 0.005″ when you flip it up and down. A shop-made clamp block can shift 1/64″ just from clamp pressure. For dowels, get a fence with T-track on top and a dedicated flip stop with micro-adjust.
4. Table flatness and size. You want a flat, replaceable insert around the bit and at least 16″ x 24″ of support. Small 12″ x 12″ tables are not enough to register a 30″ cabinet side without it tipping. Flatness matters more than thickness. A hollow torsion-box table that is flat within 0.010″ across its length will outperform a thick but warped solid wood table.
Three types of fenced tables compared
Most options fall into three categories. All can work, but they trade money for setup time and tolerance.
| Type | Typical Size | Fence System | Stop Repeatability | Best For | Street Price |
|---|---|---|---|---|---|
| Basic MDF overlay | 15″ x 20″ | MDF fence, C-clamps to table | +/- 1/64″ with shop-made block | Occasional doweling, light use | $40 – $80 |
| T-track MDF / plywood table | 18″ x 24″ to 24″ x 36″ | Aluminum T-track fence, twin T-bolts, top T-track | +/- 0.010″ with flip stop | Batch furniture parts, repeatable dowels | $120 – $220 |
| Full aluminum extrusion system | 20″ x 30″ and larger | Extruded fence with scale, micro-adjuster, integrated hold-downs | +/- 0.005″ with indexed stop | High-volume, daily use | $250 – $400+ |
The middle category is the sweet spot for most small shops. A well-built drill press table with fence and T-track gives you 90% of the repeatability of a premium system at half the cost. The basic overlay is fine if you drill fewer than 50 dowel holes a month and can tolerate a little hand-fitting. The premium system only pays off if you are drilling hundreds of holes a week and need tool-free micro-adjustment with a cursor and scale.
How to set up for repeatable dowel placement
Even the best table will not be repeatable if your setup sequence is wrong. Use this order:
Set the fence distance once, then lock it down hard. Chuck a dowel drill bit or brad-point bit the same diameter as your dowels. Lower it to the table. Measure from the fence face to the center of the bit with calipers, not a tape measure. Lock both ends of the fence and re-measure at both ends to confirm the fence did not rack while tightening. If you move the fence after this, you lose your edge reference.
Use the same face and edge every time. Mark a face side and a face edge on every part. Register the face side down on the table and the face edge against the fence for every hole. If you flip a part, your error doubles. This is the most common failure mode for first-time dowel users.
Set the stop block, then cut a test joint. Do not trust the scale on the fence. Set the flip stop, drill two scrap pieces, insert dowels dry, and check alignment with a straightedge across the joint. Adjust the stop with micro-adjust 0.005″ at a time until the faces flush. Once the test is perfect, run the entire batch without touching either setting.
Control drilling depth. Dowel depth variation causes joint gaps. Set your drill press depth stop so the bit leaves exactly 1/16″ deeper than half the dowel length. For a 1-1/2″ dowel, drill 13/16″ deep in each part. Put a collar or tape flag on the bit as a visual backup. Clean chips between holes – packed chips can reduce depth by 1/32″.
Hold the work, don’t hand-hold it. Even light feed pressure will lift a narrow stile off the table and angle the hole. Use a hold-down clamp in the fence T-track or the table T-track. A simple toggle clamp on a T-bolt eliminates creep and keeps your hands clear. If the table has no hold-down, add an aftermarket T-track hold down clamp before you chase tighter tolerances.
Failure modes to watch for
Three issues ruin otherwise good setups. First is fence creep from vibration. On benchtop presses, the table vibrates and an under-tightened fence can walk 0.005″ over 20 parts. Use nylon-insert knobs or add a star washer under the knob. Second is chip buildup against the fence. A single chip trapped between the fence and the workpiece moves the hole 0.010″ or more. Brush the fence face every 3-4 holes. Third is bit wander in hardwood. A standard twist bit will follow grain and wander up to 1/64″ in maple or white oak. Use a brad-point or dedicated dowel bit and reduce feed pressure for the first 1/8″ to let the point establish center.
When to save and when to spend
You do not need the most expensive table to get good dowels. If you already have a flat shop-made table, adding an aluminum fence extrusion with T-track and a flip stop will get you to +/- 0.010″ for under $60 in parts. That is plenty for 1/4″ and 3/8″ dowels in face frames and carcass joinery where a little glue and clamp pressure will close 0.010″.
Spend more when you are joining wide panels or mitered cases where four or more dowels must align with no visible offset. That is where 0.005″ repeatability, a micro-adjustable stop, and a rigid fence that does not need re-squaring actually save time. It is also worth spending if your drill press column has more than 0.003″ of quill runout – a better table will not fix a worn press, and you are better off putting money toward the machine itself.
For most home shops building cabinets, bookshelves, and tables, a 20″ x 24″ T-track table with a braced aluminum fence and a single flip stop is the right balance. It registers parts securely, repeats well enough that dowels go together without paring, and does not cost more than the drill press it sits on.



