Table Saw vs Band Saw for Ripping Long Rough-Sawn Boards Straight
What's inside
- Why Rough-Sawn Long Boards Are Difficult to Rip Straight
- Ripping on the Table Saw: Fast, Accurate, But Demands a Straight Edge
- Ripping on the Band Saw: Slower, Safer, Better for Straight-Lining
- Head-to-Head for Long Rough-Sawn Stock
- Which Workflow Actually Works in a Small Shop
- What to Buy Based on What You Cut
- Why Rough-Sawn Long Boards Are Difficult to Rip Straight
- Ripping on the Table Saw: Fast, Accurate, But Demands a Straight Edge
- Ripping on the Band Saw: Slower, Safer, Better for Straight-Lining
- Head-to-Head for Long Rough-Sawn Stock
- Which Workflow Actually Works in a Small Shop
- What to Buy Based on What You Cut
As an Amazon Associate I earn from qualifying purchases. This post may contain affiliate links at no extra cost to you.
Contents
- Why Rough-Sawn Long Boards Are Difficult to Rip Straight
- Ripping on the Table Saw: Fast, Accurate, But Demands a Straight Edge
- Ripping on the Band Saw: Slower, Safer, Better for Straight-Lining
- Head-to-Head for Long Rough-Sawn Stock
- Which Workflow Actually Works in a Small Shop
- What to Buy Based on What You Cut
Why Rough-Sawn Long Boards Are Difficult to Rip Straight
Rough-sawn hardwood rarely has a straight reference edge. The board is often bowed, cupped, or twisted, and 8 to 12-foot lengths magnify every deviation. If you try to run that wany edge against a table saw fence, the board will steer, pinch, and often kick back. You are not just cutting wood, you are trying to create the first straight edge on a moving, internally stressed board.
There are two distinct jobs here: 1) establishing a straight edge on one side, and 2) ripping to parallel width. A table saw excels at the second job. A band saw is safer and more forgiving for the first, especially on long, heavy stock. How you combine them depends on what tools you have and how much rough lumber you process.
As an Amazon Associate we earn from qualifying purchases at no extra cost to you.
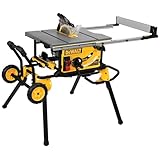
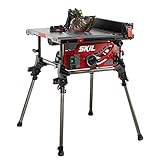


Ripping on the Table Saw: Fast, Accurate, But Demands a Straight Edge
A table saw gives you the cleanest, most parallel rip with the least effort once you have a straight edge to register against the fence. With a sharp 24-tooth rip blade, a 1.75 to 3 HP contractor or cabinet saw will feed 4/4 oak or maple at 6 to 10 feet per minute without bogging down. Kerf is typically 0.118 inch (3.0mm) for a full-kerf blade or 0.071 inch for thin-kerf, so you lose less wood than you think and the cut surface often needs only light jointing.
The failure mode on long rough boards is not power, it is control. If the board is 9 feet long and bowed 1/4 inch, only two points touch the fence. Mid-cut the board rocks, the kerf closes on the back of the blade, and you get burning, a non-parallel edge, or a kickback. Forcing it makes it worse.
To rip safely on the table saw you need three things: a straight reference edge, adequate infeed/outfeed support, and a riving knife. The right way is to create a straight edge first, either by jointing one face and one edge, or by using a straight-line rip jig. A simple jig is a 10-foot strip of 3/4 inch plywood with a toggle clamp that holds the rough board while the plywood edge rides the fence. It works, but it is awkward with a 12-foot, 40-pound slab. You need 16+ feet of clear floor space (8 feet in front and behind the blade) and a helper or roller stands.
If you already have a jointer that can handle 8-foot boards (which most 6-inch benchtop jointers cannot), the table saw is the faster finish tool. If you do not, expect to waste time and material fighting the fence.
Ripping on the Band Saw: Slower, Safer, Better for Straight-Lining
A band saw does not need a straight edge because the blade cuts without a fence, or with a single-point fence you can steer against. You can freehand a chalk line or screw the board to a straight plywood sled and follow that line. The narrow kerf (0.025 to 0.055 inch depending on blade width) wastes less wood, and because the cutting force is downward, there is no kickback. If internal tension releases and the kerf pinches, the blade just stalls in the cut instead of throwing the board.
The trade-off is cut quality and speed. Even a well-tuned 14-inch band saw with a 3/4-inch, 3 TPI hook-tooth band saw rip blade leaves a slightly rougher, often slightly wavy surface that needs jointing or planing. Resaw height matters. A stock 14-inch saw with a 1 HP motor will rip 4/4 stock easily but will wander and overheat in 8/4 hard maple if you push it. For straight-lining 8/4 or 12/4 rough lumber at length, you want 1.5 HP or more, 14 inches of throat or larger, and a fence that locks truly parallel.
Where the band saw wins is control on long lengths. You can cut a 10-foot board on a band saw with only 10 feet of shop length, because you are not trapping the board between blade and fence. You can stop mid-cut, back out, and restart. You can cut slight curves to follow grain and remove bow without trying to force a crooked board straight. For many small shops, the workflow is: chalk a line, band saw to within 1/16 inch of the line, then joint that edge straight. That jointed edge then becomes your table saw reference for the final parallel rip.
Head-to-Head for Long Rough-Sawn Stock
| Factor | Table Saw | Band Saw |
|---|---|---|
| Needs straight edge first? | Yes. Fence requires it. | No. Can follow a chalk line or single-point fence. |
| Risk on warped/bowed boards | High kickback/burn risk if board rocks or pinches | Low. Blade stalls rather than kicks |
| Cut quality off the tool | Excellent, often glue-ready with good blade | Fair to good. Usually needs jointing/planing |
| Kerf waste | ~0.071 – 0.118 in | ~0.025 – 0.055 in |
| Power needed for 4/4 hardwood | 1.75 HP adequate | 1 HP adequate |
| Power needed for 8/4 hardwood, 8 ft+ | 3 HP preferred, sharp 24T rip blade | 1.5 HP+ and 3/4 in 3 TPI blade minimum |
| Shop space for 10 ft board | ~18-20 ft total with infeed/outfeed | ~12 ft total, more maneuverable |
| Dust and noise | Louder, high dust volume | Quieter, less airborne dust |
Which Workflow Actually Works in a Small Shop
If you process rough-sawn lumber regularly and can only buy one stationary saw, think about the sequence, not just the cut.
For shops with a table saw, jointer, and planer: The ideal sequence is face-joint, plane to thickness, then straight-line one edge. If your jointer is too short to straighten a 10-foot edge reliably (and a 6-inch benchtop jointer is), use the band saw to straight-line first, then joint the band-sawn edge with one light pass. A 14-inch 14-inch band saw with a good fence will pay for itself in saved material and safer handling, even if you own a good table saw.
For shops with only a table saw: You can make it work with a straight-line jig and roller stands, but keep boards under 8 feet and under 6 inches wide for control. For anything longer or heavier, rough-cut the board to finished length plus 2 inches first. Shorter boards are exponentially easier to keep flat against the fence. Never freehand a rough edge against the fence and never remove the riving knife to make a crooked board fit. If your saw does not have a riving knife, prioritize upgrading to a cabinet table saw with riving knife before any other accessory.
For shops with only a band saw: You can go from rough board to finished width using the band saw alone, but you will need a jointer or a jointing jig for the band saw to get a true glue edge. Ripping to final width on the band saw and then cleaning up with a hand plane or jointer is viable and very wood-efficient, it is just slower than finishing on the table saw.
What to Buy Based on What You Cut
If you mostly buy S3S or S4S lumber that is already straight and you just need parallel rips, the table saw alone is the right answer. Put money into a quality rip blade, a flat fence that locks without deflection, and solid outfeed support.
If you buy rough-sawn flitches, live-edge slabs, or 10 to 12-foot hardwood from a mill at a discount, a band saw is the more important first tool for breaking down stock straight and safely. It lets you straight-line without wrestling the board against a fence, it handles tension release better, and it wastes less of that expensive wood. Most experienced shops end up using both: band saw to establish the first straight edge, table saw to rip the second edge parallel and to dimension.
Do not try to force a long, bowed board straight on either tool in one pass. Take a rough pass 1/4 inch proud of your line, let the board relax, then make a finish pass. You will get straighter results, less burning, and far less risk.