Table Saw vs Jointer for Preparing Sawn Edges on Wide Boards
What's inside
As an Amazon Associate I earn from qualifying purchases. This post may contain affiliate links at no extra cost to you.
Preparing a straight, usable edge on a wide rough-sawn board is a different job from simply cutting a board to width. The edge must be straight enough for glue-up, parallel enough for repeated parts, and safe to control through the machine. A table saw and a jointer can both help, but they solve different problems.
For most wide boards, the table saw is the cheaper and more versatile choice. A jointer is faster and more natural for straightening an edge, especially when the board is short enough to control and narrow enough to fit safely over the cutterhead. The important limitation is that neither machine automatically fixes a badly bowed, twisted, or cupped board.
As an Amazon Associate we earn from qualifying purchases at no extra cost to you.



Contents
What the machines actually do
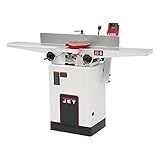
A jointer cuts the bottom face of a board flat and straightens one edge at 90 degrees to that face. Its infeed table supports the rough board, the cutterhead removes material, and the outfeed table supports the newly cut surface. Once one face and one edge are true, a planer can make the opposite face parallel, and the table saw can rip the opposite edge parallel to the jointed one.
A table saw makes a straight cut relative to its fence. It does not follow a rough edge in the same way a jointer does. If the board’s original edge is bowed, the fence may push the board sideways as the cut progresses. That can produce a curved cut, burn marks, or a dangerous kickback event. To straighten a rough edge on a table saw, you need a straight-line ripping method: a jointing jig, a straight board screwed or clamped to the workpiece, or a commercial taper/straight-line jig.
This distinction matters on wide boards. A 12-inch board may be too wide for a typical 6-inch jointer, while a 10-inch jointer may still be awkward with a long, heavy slab. The table saw does not care about the board’s width in the same way, but it does require adequate infeed and outfeed support.
Table saw vs. jointer
| Factor | Table saw with straight-line jig | Jointer |
|---|---|---|
| Initial cost | Usually lower if you already own the saw; jig may cost $20–$100 | Higher, especially for an 8-inch or wider machine |
| Maximum practical board width | Limited mainly by saw capacity and jig stability | Limited by cutterhead width |
| Edge result | Straight, clean, and parallel to the jig reference edge | Straight edge at a reliable 90 degrees to the jointed face |
| Removing bow | Yes, with a properly secured straight reference | Yes, with repeated controlled passes |
| Removing twist or cup | No, not by itself | Only from the face being jointed, and only within its capacity |
| Best use | Wide stock, repeated parts, and owners needing one machine for many jobs | Fast face-and-edge preparation on manageable boards |
When the table saw is the better choice
Choose the table saw when the boards are wider than your jointer, when you need to prepare occasional rough stock, or when budget and floor space are limited. A cabinet saw with a solid fence and good support can produce a very straight edge after the jig has been set up. It is also the better machine for bringing the second edge parallel to the first.
A straight-line jig should reference a known straight edge, not the rough edge. A common setup uses a straight plywood carrier slightly wider than the board. Screw or clamp the board to the carrier, keeping all fasteners clear of the blade path, then run the carrier against the fence. Leave only about 1/16 inch to 1/8 inch of material for the first trimming pass. Removing too much at once increases side pressure and makes the assembly harder to control.
For boards longer than about 6 feet, use substantial infeed and outfeed support. Roller stands can help, but poorly adjusted rollers can lift or steer the workpiece. A level table extension or outfeed table is more predictable. Use a riving knife, blade guard where compatible with the jig, push blocks, and a helper for heavy stock. Never hand-feed a board with a loose carrier or a reference edge that can rock.
If you need a saw primarily for this work, look at cabinet table saws with riving knives. A compact jobsite saw can do the work, but its shorter table, lighter fence, and limited support make wide slabs more difficult and less forgiving.
When the jointer is the better choice
A jointer wins for speed and repeatability when the board fits the machine. With a properly adjusted fence, two or three passes can establish a clean edge. You can then square the opposite edge or rip it parallel on the table saw. The operation is especially convenient when preparing several boards for glue-up.
Width is the hard limit. A 6-inch jointer cannot flatten a 9-inch face in one pass, regardless of motor power. You can joint a portion of a wider face, but that creates a step or uneven reference unless you use a sled or another milling method. An 8-inch jointer handles an edge on wide boards comfortably, but it still cannot flatten the full face of a 12-inch slab.
Length matters too. A board shorter than roughly 30 inches can be difficult to register consistently because it has little support on either table. Long boards need room on both sides of the cutterhead; a 6-foot board may require 10 feet or more of clear space to feed safely. Examine the grain direction, take light cuts, and support the board without forcing it down into a hollow section.
For a shop that regularly processes rough lumber, an 8-inch woodworking jointer is a practical middle ground. A 6-inch machine is fine for furniture parts and narrower boards, but buying one specifically for wide slabs often leads to disappointment.
When the cheaper option is enough
If you already own a table saw and prepare only a few wide boards each year, buying a jointer is hard to justify. A straight-edge jig, a sharp blade, and proper support can produce glue-ready edges. You may need a light final pass with a hand plane or router afterward, but the result can be excellent.
If you already own a jointer narrower than the stock, do not assume a larger machine is mandatory. For many projects, use the jointer on the board’s reference edge, then rip the other edge on the table saw. For face flattening, use a sled through a thickness planer or have a lumber supplier mill the stock first.
Buy the jointer when setup time is becoming a regular burden, when you process multiple boards every week, or when you need a flat face and square edge as part of the same workflow. Buy the table saw first when your work includes sheet goods, repeated-width parts, dados, tapers, and general ripping. In a small shop, its wider range usually delivers more useful capacity per dollar.
Common failure modes
A table-saw edge can be straight but not square if the board tilts on the jig. A jointer edge can be square but not straight if the operator presses down over the outfeed too early or takes inconsistent passes. Both machines can create burn marks with a dull blade or cutterhead, excessive depth of cut, or a fence that is not aligned correctly.
Neither machine should be used to force a severely twisted board flat. Shim it to a sled, remove the twist with a controlled first operation, or have it milled. Trying to trap unstable stock against a fence is a reliable way to get a poor cut and an unsafe one. For occasional edge preparation, straight-edge table-saw jigs are the economical solution; for frequent rough-lumber work, the jointer earns its floor space through speed.

