Best Sanders for Walls: Smooth Finishes With Less Fatigue
What's inside
As an Amazon Associate I earn from qualifying purchases. This post may contain affiliate links at no extra cost to you.
Contents
Best Sanders for Walls: Match the Tool to the Room
The best sander for walls is usually a variable-speed drywall pole sander with a vacuum connection for broad, high walls; for small repairs and tight spaces, a compact random-orbit or detail sander is easier to control. Choose by reach, tool weight, dust collection, and pad shape—not power alone. For ceilings, prioritize a light head and a well-balanced pole; for corners, use a detail pad or hand-sanding block rather than forcing a large round head into the angle.
Quick picks by situation
- Whole room or frequent drywall work: A powered drywall sander with an adjustable-length pole, variable speed, and a shroud connected to a suitable dust extractor.
- One wall or occasional renovation: A hand pole sander with replaceable mesh or paper discs. It costs less and is lighter to store, though it takes more effort and creates more airborne dust.
- Patch repairs and trim near walls: A 5-inch random-orbit sander for open areas, plus a compact detail sander or sanding sponge for edges.
- Ceilings: A lightweight drywall sander with a long pole, a pivoting head, and effective extraction. If the pole feels tiring to hold at shoulder height, it will feel worse overhead.
- Inside corners: A hand sanding sponge or narrow detail tool. Round pads leave an unsanded strip or can damage the adjacent face when pushed into a corner.
Compare the main wall-sanding options
These ranges describe common tool formats, not every model. Check the manufacturer’s specifications: listed weight may exclude the pole, hose, or battery, and abrasive sizes are not interchangeable between every tool.
As an Amazon Associate we earn from qualifying purchases at no extra cost to you.


| Tool type | Typical pad | Typical working reach | Typical tool weight | Best fit |
|---|---|---|---|---|
| Hand pole sander | 8.5 × 3.25 in rectangular head, or 9 in round head | About 3–6 ft pole, often extendable | About 1–3 lb, without abrasive | Small projects, low budgets, simple drywall touch-ups |
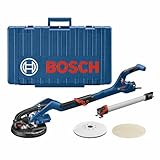
| Powered drywall sander | About 8.5–9 in round head | Commonly about 4–6 ft adjustable pole | About 8–10 lb for the tool; verify whether pole is included | Large walls, ceilings, frequent renovation work |
| 5-inch random-orbit sander | 5 in round disc | Hand-held; no pole | About 2–4 lb, depending on corded or cordless design | Small flat patches, paint preparation, nearby woodwork |
| Detail sander | Triangular pad, typically about 3–4 in across | Hand-held; no pole | About 1–3 lb | Edges, narrow areas, and repairs near inside corners |
How to choose for your walls
Start with the area and frequency
For a few small joint-compound patches, a hand pole sander or sanding sponge is often the sensible buy. A powered drywall sander can save time across several rooms, but the pole, hose, and larger head take storage space and need setup. For a rough cost-per-use check, divide the tool’s purchase price by the number of projects you expect to use it on. A $120 tool used for 12 projects works out to $10 per project before abrasives and extraction equipment; at two projects, it is $60 per project. Treat the figures as examples, not market quotes.
Check reach and balance, not just maximum pole length
A pole that reaches the ceiling without a ladder is useful only if you can steer it comfortably. A longer pole increases leverage on your arms and makes it harder to keep the head flat. Look for a locking adjustment that stays put, a swivel head that follows the wall, and controls that you can reach while holding the tool. For overhead sanding, compare total working weight and balance rather than relying on the bare tool weight.
Choose pad shape to match the surface
Round heads cover broad areas efficiently and work well with powered drywall sanders, but they do not reach neatly into square corners. Rectangular hand heads make it easier to follow seams and edges. Triangular detail pads and hand sanding sponges are better for tight spots. Keep a small hand-sanding option even if you buy a powered tool: it helps finish corners and prevents over-sanding around outlets, trim, and repaired edges.
Make dust extraction part of the purchase
Drywall dust is very fine. A shroud connected to an appropriate dust extractor can reduce the mess, but the result depends on a good hose connection, clean filter, and suitable abrasive. Check the tool’s hose diameter and connection method before buying; adapters can add cost and may loosen or restrict airflow. A standard shop vacuum is not automatically suitable for fine dust or prolonged use. Follow its manual for filter and bag requirements, and use appropriate respiratory and eye protection even when extraction is connected.
Match the tool to your project
| Situation | Practical choice | Why |
|---|---|---|
| One small patch; limited storage | Sanding sponge or hand pole sander | Low setup and storage demands; easy to control locally |
| Several rooms; walls and ceilings | Powered drywall sander with adjustable pole and extraction | Broad head and powered movement reduce repetitive manual work |
| Experienced user, frequent renovations | Variable-speed drywall sander with replaceable pads and common abrasives | Adjustable speed and available consumables make it easier to adapt and maintain |
| Beginner working around trim and corners | Hand pole sander plus detail sander or sponge | Smaller tools are easier to position without scuffing adjacent surfaces |
| Painted wall preparation, not just drywall compound | 5-inch random-orbit sander where appropriate | Useful for flat surface preparation; check coating condition and dust controls first |
A setup that helps avoid rework
- Let joint compound dry fully. Sanding damp compound can clog the abrasive and tear the surface instead of smoothing it.
- Choose a suitable grit. Around 120–150 grit is a common starting range for smoothing drywall compound; finer abrasive can help with light finishing. Follow the compound and abrasive makers’ guidance, and test an inconspicuous area. Coarse grit can gouge soft compound or cut through paper facing.
- Connect extraction and check airflow. Fit the correct hose and clean or replace the extractor filter as directed. Weak suction lets dust escape and can load the abrasive faster.
- Use light, even pressure. Keep the head flat and moving. A powered sander does not need to be pressed hard against the wall; excess pressure can leave circular marks, dig into high spots, or strain the head and pole.
- Inspect with side lighting. Shine a work light along the wall to reveal ridges and shallow depressions, then mark only the areas that need another pass. This avoids repeatedly sanding a surface that is already smooth.
- Finish corners by hand. Stop the large head short of the corner and use a sponge or detail pad to blend the last strip without hitting the adjoining wall.
Ownership details that affect the real cost
Abrasive discs and mesh wear out first, especially when compound residue clogs them. Replace a loaded abrasive rather than pushing harder; added pressure can overheat the tool or damage the wall. With hook-and-loop pads, accumulated dust can reduce grip and cause discs to slip. Clean the pad as the manufacturer permits, and replace it if its hooks no longer hold securely.
After each session, disconnect power, clear dust from the head and vents using the method specified in the manual, and inspect the hose, shroud, pole locks, and cord or battery. Do not blow fine drywall dust around a room with unfiltered compressed air. Store abrasive flat and keep the head from resting on its pad, which can deform or contaminate the backing surface.
Before buying, confirm that replacement abrasives are easy to find in the pad size and attachment style your tool requires. A bargain sander with unusual discs, a fragile shroud, or an awkward hose connection may cost more in downtime and accessories than a simpler model with common consumables.
Bottom line
For large rooms and repeated ceiling work, choose a variable-speed powered drywall sander with a manageable pole, a well-balanced head, and dust extraction you can actually connect and maintain. For occasional repairs, a hand pole sander is often enough. Add a sponge or detail sander for corners, and choose a 5-inch random-orbit sander only when its compact, hand-held format suits the wall area and finish you are preparing.