Best Router Table Plans: Free and Paid Builds Worth Your Time
What's inside
- Best Router Table Plans: Free and Paid Builds Worth Your Time
- Quick comparison of the best plan types
- Best budget choice: a simple benchtop router table
- Best portable option: a foldable router table
- Best long-term build: an enclosed cabinet table
- When a paid plan is worth the money
- Decision matrix: which plan fits your shop?
- Precision hardware: where the budget goes
- Setup and maintenance details plans often miss
- Final recommendation
- Related Guides
- Best Router Table Plans: Free and Paid Builds Worth Your Time
- Quick comparison of the best plan types
- Best budget choice: a simple benchtop router table
- Best portable option: a foldable router table
- Best long-term build: an enclosed cabinet table
- When a paid plan is worth the money
- Decision matrix: which plan fits your shop?
- Precision hardware: where the budget goes
- Setup and maintenance details plans often miss
- Final recommendation
- Related Guides
As an Amazon Associate I earn from qualifying purchases. This post may contain affiliate links at no extra cost to you.
Contents
- Best Router Table Plans: Free and Paid Builds Worth Your Time
- Quick comparison of the best plan types
- Best budget choice: a simple benchtop router table
- Best portable option: a foldable router table
- Best long-term build: an enclosed cabinet table
- When a paid plan is worth the money
- Decision matrix: which plan fits your shop?
- Precision hardware: where the budget goes
- Setup and maintenance details plans often miss
- Final recommendation
- Related Guides
Best Router Table Plans: Free and Paid Builds Worth Your Time
The best router table plan depends on your priority: build a compact table from plywood for about $100, choose a paid cabinet plan for better dust control and storage, or buy a precision insert-and-lift system when adjustment accuracy matters more than the satisfaction of building every part.
This roundup compares practical plans for router tables by cost, skill level, footprint, dust collection, and bit storage. It covers free router table plans, paid woodworking drawings, portable designs, and shop-sized cabinets so you can choose a build that matches how you actually work.
As an Amazon Associate we earn from qualifying purchases at no extra cost to you.


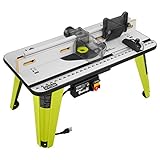
Quick comparison of the best plan types
| Plan type | Typical material cost | Finished size | Skill level | Dust collection | Best for |
|---|---|---|---|---|---|
| Basic benchtop table | $70–$150 | 24 x 18 x 12 in. | Beginner | Basic shroud or none | Occasional routing and small shops |
| Foldable portable table | $100–$220 | 30 x 20 x 36 in. open | Beginner to intermediate | 2-1/2 in. port possible | Shared garages and jobsite-style work |
| Enclosed cabinet table | $220–$500 | 36 x 24 x 36 in. | Intermediate | Very good with a 4 in. port | Frequent furniture and cabinet work |
| Precision lift cabinet | $600–$1,200 | 36 x 24 x 36 in. | Intermediate to advanced | Excellent when sealed | Repeatable production routing |
These figures assume you already own a router and dust extractor. A router table plan is only the cabinet and top; the insert plate, lift, fence hardware, and switch can easily cost more than the wood.
Best budget choice: a simple benchtop router table
For occasional edge profiles, rabbets, and small joinery jobs, a compact benchtop design is the most sensible of the free plans for a router table. Use a 3/4-inch plywood top with a replaceable hardboard or laminate surface, a two-piece plywood fence, and a removable mounting plate.
Look for a plan that specifies:
- A top at least 24 x 18 inches, large enough to support typical cabinet parts without becoming awkward to store.
- A fence opening that accepts interchangeable throat inserts or a sacrificial face.
- Four mounting points for the router plate rather than relying on loose screws near the opening.
- A separate dust box under the bit, even if it uses only a 2-1/2-inch hose.
- Positive clamps or threaded knobs so the fence cannot shift while cutting.
A realistic material calculation is 1/2 sheet of 3/4-inch plywood at $35–$60, hardboard or laminate at $15–$30, T-track and knobs at $25–$50, and a switch or extension-box assembly at $20–$40. That produces a useful table for roughly $95–$180 before buying a plate.
The limitation is height adjustment. If your router remains mounted underneath, changing bit height may require reaching below the table and making small adjustments with the router’s built-in mechanism.
Best portable option: a foldable router table
Portable router table plans are worthwhile when the table must move between a garage, driveway, or shared workshop. The strongest designs use folding legs or a detachable base, but keep the top rigid. A table that flexes under sideways pressure will produce inconsistent rabbets and unsafe fence movement.
Choose a plan with a top no smaller than 28 x 20 inches and legs that lock mechanically rather than relying only on friction hinges. A 2-1/2-inch dust port is usually the practical compromise: it fits compact extractors and keeps the rear of the fence relatively small. Add a carrying handle and a storage compartment for the fence faces, insert rings, and wrench.
Portable designs are less stable than cabinet tables. Add a 40–60 lb ballast shelf or clamp the table to a workbench when routing wide stock. For long boards, use an outfeed support; the router table itself should not be asked to support the entire workpiece.
Best long-term build: an enclosed cabinet table
An enclosed cabinet is the better router table woodworking plan for anyone routing every week. The cabinet adds mass, reduces vibration, improves dust capture, and creates useful storage for bits and accessories.
A good cabinet plan includes a 36 x 24-inch top, a 4-inch dust port at the rear, a sealed compartment around the router, and at least two drawers. One shallow drawer can hold collet wrenches, insert rings, and setup gauges; a deeper drawer can store router bits in removable trays.
Use two layers of 3/4-inch plywood for the top, or one plywood layer with a flat, replaceable surface. Check the finished top with a straightedge before installing the plate. A difference of even 1/16 inch across the work area can affect bearing-guided profiles and panel work.
For the fence, 3/4-inch plywood is adequate for ordinary work, while aluminum extrusion or a commercial fence gives better long-term dimensional stability. Sacrificial MDF faces are useful because they can be replaced after repeated dadoes and joint cuts.
When a paid plan is worth the money
Paid router table plans from established woodworking publishers and tool manufacturers are usually worth considering when they include more than a cut list. The useful additions are full-size drilling layouts, plate dimensions, fence alignment details, dust-box geometry, and instructions for adapting the design to a specific lift or insert plate.
A $10–$30 plan can save several hours of layout work and prevent an expensive mistake in the top. Pay for a plan if you are building a permanent cabinet, using a lift, or adding drawers and a dust chamber. A free plan is sufficient for a basic box table when you are comfortable checking dimensions yourself.
Be cautious with any plan that gives no allowance for plywood thickness, does not identify the router plate dimensions, or shows a fence without a method for locking it parallel to the miter slot. Those omissions often create more work than the plan saves.
Decision matrix: which plan fits your shop?
| Your situation | Recommended build | Why | What to avoid |
|---|---|---|---|
| Under $150 and fewer than four uses per month | Basic benchtop plan | Lowest cost and easy to store | Overspending on a lift |
| Limited floor space | Foldable portable plan | Can hang on a wall or store under a bench | Oversized cabinet bases |
| Weekly cabinet or furniture work | Enclosed cabinet plan | Mass, dust control, and accessory storage | Open-bottom tables |
| Frequent bit changes and repeatable setups | Precision lift cabinet | Above-table adjustment and better repeatability | Plans with nonstandard plate openings |
| Already own a Kreg or Rockler insert system | Plan built around that system | Less custom fitting and easier replacement parts | Generic drawings without plate measurements |
Precision hardware: where the budget goes
A basic plate may cost about $60–$150. A heavier lift system from brands such as JessEm, Kreg, or Rockler can cost roughly $250–$600, depending on the router compatibility and adjustment mechanism. Confirm compatibility before cutting the top: some lifts are designed around specific motor diameters, while others accept only certain router bodies.
For a table used several times per week, the lift can justify its cost. Above-table adjustment makes bit changes faster, and a solid lift reduces the temptation to reach beneath the table while the router is connected. It does not remove the need to unplug the router before changing a bit.
Setup and maintenance details plans often miss
- Level the plate. Use the plan’s leveling screws or thin shims so the plate is flush with the surrounding top. Test with a straightedge in several directions.
- Align the fence. Set the fence parallel to the miter slot, then use a straight bit and scrap wood to verify that the opening does not force the workpiece sideways.
- Seal the dust path. Caulk cabinet joints and close unused openings. A sealed 4-inch cabinet port generally captures more debris than a large unsealed box.
- Clean the collet. Brush dust from the collet and spindle area periodically. Do not insert a bit into a dirty collet or leave it bottomed out; seat it fully, then lift it slightly before tightening.
- Replace wear parts. Expect sacrificial fence faces, insert rings, and sometimes the tabletop skin to wear first. A replaceable surface is cheaper than rebuilding the entire top.
The most common mistake is making the opening too large. A smaller opening supported by interchangeable rings gives better workpiece support and reduces the amount of debris entering the cabinet. The second is building a tall fence without enough base width; the fence may tip or shift when pressure is applied near the top.
Final recommendation
Choose a free, compact plan if you are learning or use a router table occasionally. Choose a paid cabinet plan if dust collection, drawers, and a durable top matter more than the lowest initial cost. For frequent production routing, build the cabinet around a compatible lift and a 4-inch dust port. The best plans for router table projects are not necessarily the most elaborate; they are the ones that specify the plate, fence, dust path, and storage details before you cut the first panel.