How to Build a Table Saw Tapering Jig for Chair Legs
What's inside
As an Amazon Associate I earn from qualifying purchases. This post may contain affiliate links at no extra cost to you.
Tapered chair legs look complicated, but the cut is simple: hold the leg at a fixed angle and run it past the table-saw blade. The difficult part is making a jig that stays square, does not shift during the cut, and keeps your hands away from the blade.
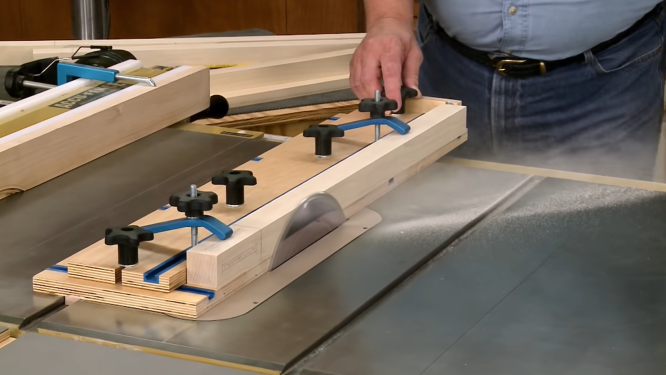
This jig is a sled with a hinged or fixed stop at one end. The chair-leg blank rests against the stop, while a long fence holds it in position. You can make one from plywood and hardwood scraps in about an hour. It works best for straight tapers on square or rectangular legs, not for compound tapers or turned legs.
Contents
Materials and Tools
Use 3/4-inch plywood for the sled and fence. A sled about 8 inches wide and 30 inches long handles most chair legs, but make it longer if your legs exceed 24 inches. You will also need a straight hardwood fence, two or three clamps, wood screws, a stop block, and a runner that fits your table-saw miter slot.
A plywood base is the cheaper option and is perfectly adequate for occasional work. A slick plastic or phenolic sled runs more smoothly and resists seasonal movement, but it costs more and does not improve the accuracy of a poorly aligned fence. For construction, a 3/4-inch plywood sheet and a table-saw miter-slot runner are the main purchased components.
| Jig material | Advantages | Drawbacks | Best use |
|---|---|---|---|
| 3/4-inch plywood | Inexpensive, easy to cut, widely available | Can wear or warp if stored poorly | Occasional projects and general furniture work |
| Phenolic or plastic sheet | Flat, smooth, moisture resistant | More expensive and harder to fasten | Frequent use or a dedicated shop jig |
| Solid hardwood fence | Easy to screw into and replace | Can move with humidity if not straight-grained | Most home-shop builds |
Design the Jig
Cut the sled to approximately 8 by 30 inches. Its length should be at least 6 inches longer than the chair-leg blank. Install the runner near the centerline or slightly to one side so the sled travels in one miter slot without touching the blade.
Attach a straight fence along one long edge, leaving enough room for the leg and clamps. The fence should be 2 to 3 inches tall. Its job is to keep the blank from rotating; it is not a guide that should contact the blade. Leave at least 2 inches of wood between the fence and the blade’s cutting path.
At the front of the sled, install a stop block perpendicular to the fence. A removable stop held with screws or a small toggle clamp is more useful than a permanently fixed stop. It lets you position different leg lengths and replace the stop if the blade nicks it.
For a simple taper, the leg rests flat on the sled and against the fence. To taper two adjacent faces, use the same jig for the first two cuts, then rotate the leg 90 degrees and register the already-cut face against the fence. Mark the reference faces clearly with a pencil.
Set the Taper Angle
Calculate the taper before cutting. If a leg is 24 inches long and you want it to become 1/2 inch narrower, the change is 1/2 inch over 24 inches. That is a shallow angle, so small setup errors matter.
One reliable method is to mark the desired narrow end on the blank, then place the blank on the jig and align its marks with the fence. For repeat work, make a tapered spacer or angled guide block that positions the blank consistently. Do not rely on a ruler held near the blade for every cut.
Keep the top portion of a chair leg square if it will enter an apron or mortise. Mark a no-cut zone, commonly 3 to 4 inches at the upper end, and stop the taper there. The stop block or a second reference mark should prevent you from accidentally tapering the joint area.
Build and Align the Jig
Cut the sled and fence accurately, then fasten the fence with screws from below if possible. Predrill the holes to avoid splitting. Check the fence with a reliable precision engineer’s square. It must be square to the sled edge and parallel to the sled’s travel direction.
Attach the miter-slot runner with the sled sitting in the slot. Make the runner snug but not tight. The sled should slide without side-to-side play, yet it must not bind halfway through the stroke. Wax on the runner and the table surface can improve movement; do not use a lubricant that leaves an oily residue near the wood.
With the saw unplugged, slide the jig past the blade and check the clearance. Raise the blade only high enough to cut through the blank by about 1/8 inch. A blade set far above the work increases exposed teeth and makes kickback more severe.
Make the Cuts
Use a sharp, general-purpose or combination blade with a flat-running plate. A clean blade reduces burning and requires less pushing force. If you regularly cut hardwood chair parts, a 60-tooth table-saw combination blade is a practical choice. The cheaper blade you already own is fine if it is sharp, stable, and leaves an acceptable surface.
Set the blank against the stop and fence. Clamp it down with one clamp near the wide end and another near the narrow end, keeping the clamps well away from the blade path. If the blank rocks, stop and correct the problem; do not try to hold it down by hand while feeding.
Start the saw, stand slightly to the side of the blade, and push the sled smoothly through the cut. Do not stop in the wood. Let the blade reach full speed first, and keep both hands on the sled handles or on safe areas behind the leading edge. Turn off the saw and wait for the blade to stop before removing the workpiece.
After the first cut, inspect the taper and check the remaining stock with a straightedge. If you need to cut a second face, use the marked reference surface and reset the stop exactly. Test the setup on scrap before cutting expensive, figured, or already-machined legs.
Common Failures and Safety
A taper that varies from leg to leg usually indicates movement against the fence, an inconsistent stop, or a runner with too much play. A wedge-shaped cut that is not intentional usually means the fence is not parallel to the travel path. Burning points to a dull blade, a slow feed, or the work rubbing the blade after the cut.
Never use the table-saw rip fence as the only guide for this operation unless the workpiece and jig are specifically designed to avoid trapping the offcut. A tapering sled should carry the work past the blade as one controlled unit. Remove loose clothing, use eye and hearing protection, and use a push handle if your hands would approach the blade. A featherboard may help hold the blank down, but it must not force the work sideways into the blade.
Before each session, check that the sled is flat, the screws are tight, the stop is secure, and the blade path is clear. Those checks take less time than correcting a crooked chair leg—or recovering from a kickback.



