Best Biscuit Joiners for Beginners: Simple Alignment and Setup
What's inside
As an Amazon Associate I earn from qualifying purchases. This post may contain affiliate links at no extra cost to you.
Contents
Best Biscuit Joiner for Beginners: Our Picks by Situation
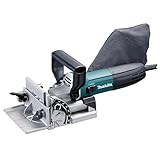
The best biscuit joiner for beginners is the Makita PJ7000: its clear, preset depth controls, familiar fence adjustments, and manageable size make it a practical choice for learning accurate, repeatable joints. Choose the DEWALT DW682K if you prefer a larger grip and a straightforward setup, or a corded RYOBI plate joiner if keeping the initial cost down matters most.
A biscuit joiner cuts matching crescent-shaped slots in two pieces of wood. A compressed-wood biscuit, often called a plate-joining biscuit, fits into the slots with glue and helps align the faces while the joint is clamped. It is useful for edge-gluing boards, joining cabinet parts, and aligning panels—not a replacement for strong joinery in every structural application.
As an Amazon Associate we earn from qualifying purchases at no extra cost to you.


Quick Comparison
Published dimensions and weights can differ slightly by market and whether a listing includes accessories. Confirm the exact model and manual before buying. Prices below are broad U.S. market ranges, not live quotes.
| Model | Power and weight | Depth and fence controls | Best fit | Typical price range |
|---|---|---|---|---|
| Makita PJ7000 | 5.6 A corded; about 5.5 lb | Preset stops for common biscuit sizes; adjustable fence with angle settings | Beginners who want repeatable settings in a compact tool | $180–$250 |
| DEWALT DW682K | 6.5 A corded; about 6.6 lb | Depth adjustment for common biscuit sizes; adjustable fence with tilt capability | Users who value a substantial grip and established corded design | $180–$260 |
| RYOBI corded plate joiner | Corded; weight varies by model and package | Look for a model with clearly marked biscuit-size stops and an adjustable fence | Occasional projects on a tighter budget | $80–$150 |
RYOBI model names and specifications can vary by region and change over time, so check the current manual for the exact tool sold near you. For any model, verify whether the package includes a dust bag, wrench, case, and blade.
Choose by Your Workshop and Projects
| Your situation | What to prioritize | Best starting point |
|---|---|---|
| First joiner; a few projects a year | Preset depth stops, an easy-to-read fence scale, and a manageable price | RYOBI corded model with verified settings |
| Frequent panel or cabinet work | Repeatable depth controls, a stable fence, and dependable dust extraction | Makita PJ7000 |
| Large hands or preference for a fuller grip | Comfortable handle and a secure two-handed hold | Compare the DW682K in person if possible |
| Limited storage or no dust extractor | Compact body, included dust bag, and easy-to-clean bag connection | Makita PJ7000, with dust collection checked at purchase |
For a first tool, a corded joiner is usually simpler than choosing a battery platform: there is no battery runtime or extra battery cost to plan around. If you already own compatible cordless tools, compare that convenience against the price and weight of the cordless joiner and batteries.
What Makes a Joiner Beginner-Friendly?
Clear, repeatable depth settings
Common biscuit sizes are #0, #10, and #20. A useful depth system provides marked stops for these sizes and a way to fine-tune the cut if the biscuit sits too proud or too deep. Presets reduce guesswork, but do not guarantee a perfect fit: blade condition, biscuit thickness, and the tool’s adjustment all matter.
A fence that is easy to set and lock
Look for a fence with readable height markings and a lock that holds firmly. A loose fence can tilt or shift during a plunge, producing slots that do not line up. For beginners, a simple 90-degree setup is more important than a long list of angle settings.
Comfort, balance, and dust handling
You need to hold the tool square to the work and plunge it without rocking. A comfortable grip and reachable controls help. A dust bag is handy for a few cuts, but its capacity is limited; a shop vacuum usually collects chips more effectively during longer sessions. Check that the port or adapter fits your collection hose before assuming it will.
Usable instructions and replacement parts
Clear instructions should explain blade changes, fence adjustment, depth calibration, and safe workholding. Also check that the manufacturer supplies replacement blades and that the blade is a standard size for the model. A worn or damaged blade can burn wood and make cuts less consistent.
Setup for a Reliable First Joint
-
Prepare matching edges. Joint or otherwise straighten the edges and dry-fit the boards. A joiner aligns pieces; it does not correct a bowed edge or a badly mismatched surface.
-
Mark both boards together. Lay the pieces in their final orientation and draw registration lines across the seam. Keep marks far enough from ends to avoid breaking through the edge.
-
Set the fence and depth. For typical 3/4-inch stock, a #20 biscuit is a common starting choice when the tool’s manual and the board width allow it. Set the depth stop to #20 and check the fence position against the workpiece. Do not assume every board can safely take the same biscuit size.
-
Make a test cut. Use offcuts of the same thickness. Cut matching slots, insert a biscuit dry, and check that the boards meet flush. If the biscuit sits proud, confirm the depth setting and calibration before changing anything else.
-
Clamp and cut safely. Secure the work so it cannot shift, keep hands clear of the blade path, and let the tool reach full speed before plunging. Keep the base and fence seated against the work throughout the cut.
-
Dry-fit, then glue and clamp. Assemble the joint without glue first. For the final assembly, work promptly: biscuits and slots can swell as they absorb glue, reducing the time available for adjustment.
A useful check on setup is a small two-board test joint before cutting a full project. It costs one biscuit and a pair of offcuts, but can prevent a batch of misaligned slots or a panel that will not close evenly.
Ownership: What Needs Attention First?
The blade is a wear item. Dullness, resin buildup, or a chipped tooth can lead to rough slots, extra heat, and less predictable cuts. Unplug the tool before inspecting or cleaning it, and follow the manual for blade removal; do not touch the cutting edge to check sharpness. Replace a damaged blade rather than trying to work around it.
Wood dust and chips can clog the chute, dust bag, or vacuum adapter. Empty the bag before it becomes packed, and clear the port with the tool disconnected. Keep the base and fence clean so sawdust does not hold the tool away from the surface. Store the joiner with the blade retracted and the cord protected.
Common beginner problems are using a biscuit that is too large for the stock, setting the fence at different heights on matching pieces, and allowing the tool to rock during a cut. Make a test joint when changing board thickness, biscuit size, or fence angle. For repeated furniture or cabinet work, the Makita’s combination of presets and compact handling is a strong place to start; for occasional edge joints, a carefully checked budget corded model may be enough.

