Best Type of Sander for Furniture Refinishing
What's inside
As an Amazon Associate I earn from qualifying purchases. This post may contain affiliate links at no extra cost to you.
Contents
The best type of sander for furniture refinishing
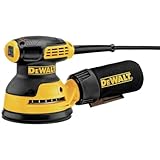
For most flat furniture surfaces, a 5-inch random-orbit sander is the best all-around choice; use a detail sander or hand sanding for corners and carved areas, and reserve a belt sander for sturdy, broad surfaces where fast stock removal matters more than precision. If the piece is veneered, thin, or valuable, favor hand sanding and light passes with a random-orbit sander—or skip machine sanding altogether.
The right tool depends less on a sander’s advertised power than on what you’re removing and how much material the furniture can safely lose. Old finish may clog abrasives, veneer can be surprisingly thin, and a rounded profile or carved edge is easy to flatten. Choose for the surface first, then match the abrasive and technique to the job.
As an Amazon Associate we earn from qualifying purchases at no extra cost to you.


Choose by furniture shape and risk
| Sander or method | Typical size and weight | Best use | Main risk or limitation |
|---|---|---|---|
| 5-inch random-orbit sander | 5-inch disc; roughly 2.5–4 lb | Tabletops, cabinet sides, broad rails, and general surface prep | Can leave swirl marks or cut through veneer if held still or used too aggressively |
| Detail sander | Triangular pad, often about 3–4 inches across; roughly 2–3 lb | Inside corners and small, flat areas a round pad cannot reach | Pointed tip concentrates pressure and can wear through edges quickly |
| Belt sander | Commonly 3 × 21-inch belt; roughly 6–10 lb | Fast removal on sturdy, flat, solid-wood surfaces | High removal rate makes gouges, dips, and veneer damage easy |
| Hand sanding with a block or shaped pad | Pad size varies; tool weight is minimal | Veneer, curved profiles, carvings, delicate edges, and final smoothing | Slower over large areas; uneven finger pressure can still create dips |
These are approximate ranges, not a guarantee of fit for every model. Cordless versions can weigh more once the battery is attached. A lighter sander is easier to control on vertical panels, while effective dust collection and a comfortable grip often matter more than small differences in motor power.
For tabletops and other broad, flat surfaces
A 5-inch random-orbit sander is the most versatile starting point. Its combined spinning and orbital motion generally leaves a more forgiving pattern than a belt sander, especially when you keep it flat and moving. It works well for removing finish residue, smoothing repaired areas, and preparing sound wood for a new coating.
It is not a shortcut through every old finish. Paint, shellac, and some gummy coatings can clog a disc quickly. Test a small area first. If the finish loads the abrasive, remove most of it with a suitable stripping method or scraper before sanding, following the product directions and local safety guidance. Sanding unknown old paint can create hazardous dust; identify the coating and use appropriate containment and protection.
For corners, spindles, and carved details
Use a detail sander only where its triangular pad can sit flat. Its tip reaches tight spots but also concentrates pressure, so avoid leaning on it or holding the point in one place. For rounded legs, molding, and carved profiles, use folded abrasive or a shaped sanding pad that matches the contour. That preserves the existing shape better than forcing a flat machine onto it.
For veneer or delicate furniture
Start by checking the surface and edges for bubbling, chips, exposed substrate, or a visible veneer seam. If veneer is thin or uncertain, hand sanding is the safer default. A random-orbit sander may be appropriate on a sound, broad panel, but use a light touch, fine abrasive, and a brief test in an inconspicuous area. Avoid belt sanding veneer: the belt can remove the decorative layer before the damage is obvious.
Match the tool to your project
| Your situation | Best fit | Why |
|---|---|---|
| First refinishing project, one dresser or table, limited storage | 5-inch random-orbit sander plus a hand-sanding block | One versatile machine handles the large panels; the block reaches edges and contours without another bulky tool. |
| Mostly carved chairs, narrow trim, or intricate corners | Hand sanding; add a detail sander for suitable flat pockets | Control and shape preservation matter more than speed. |
| Repeated work on solid-wood tabletops or large, flat panels | Random-orbit sander; belt sander only for demanding, coarse removal | The random-orbit tool is easier to control for routine prep; the belt tool is fast but less forgiving. |
| Veneered, antique, or otherwise valuable piece | Hand sanding and cautious finish removal | Minimizes the chance of cutting through veneer or softening crisp details. |
| Small, occasional jobs and tight budget | Hand block first; buy a sander only if broad surfaces justify it | A block has little storage or maintenance cost, though it takes longer across large panels. |
Set up for clean, controlled sanding
-
Inspect and identify the surface. Look for veneer, loose joints, nails, raised grain, and damaged finish. Remove hardware and mask areas you do not want abraded.
-
Start with the least aggressive method that can do the job. On sound wood, begin with a moderate abrasive rather than jumping to a very coarse grit. For light scuff-sanding between coats, use the finish maker’s guidance; the goal is usually to dull the surface, not remove a layer of wood.
-
Test before committing. Sand a hidden spot briefly, inspect the result, and check that the coating is not clogging the disc. On veneer, stop if the color or substrate changes.
-
Keep the pad flat and moving. Let the abrasive do the work; pressing harder increases heat and the chance of uneven removal. Overlap passes consistently, and keep the machine away from sharp edges unless you can control the pad precisely.
-
Progress through finer abrasives only as needed. Remove the previous grit’s scratches before moving finer. Vacuum the surface between grits so loose particles do not create deep stray scratches.
-
Finish profiles by hand. Sand with the grain where practical, using a block on flat edges and a shaped pad on curves. Do not flatten raised details just to make the surface uniformly smooth.
Ownership details that affect the result
On a random-orbit sander, discs and the hook-and-loop pad are the main wear items. Dust can clog the pad’s hooks, weakening its grip; clean it regularly and replace a worn pad if discs no longer stay centered. Detail-sander pads also wear at the tip first, especially when the point is used as a scraper. Belt-sander belts can load with finish residue, track poorly, or wear unevenly if the tool is tilted.
Match discs to the sander’s hole pattern and use dust collection where available. A shop vacuum with a suitable adapter can reduce cleanup, but it does not replace a properly fitted respirator or good ventilation. Keep abrasive sheets clean, change them when cutting slows, and avoid sanding with a clogged disc: it generates more heat without reliably removing material faster.
Common mistakes include starting too coarse, pressing down, sanding across fragile veneer edges, and trying to use one machine on every shape. For furniture refinishing, the most useful setup is often modest: a 5-inch random-orbit sander for broad panels, hand abrasives for contours, and a detail sander only if the piece has flat recesses that need it.