Best Jointers for Low-Tearout Edge Jointing
What's inside
As an Amazon Associate I earn from qualifying purchases. This post may contain affiliate links at no extra cost to you.
Contents
Why Edge Jointing Tears Out
Edge jointing looks simple until you run figured maple or quartersawn white oak through and get chipped grain that won’t glue. Tearout on the jointer happens for two reasons: the knives lift the wood fibers instead of shearing them, and the grain direction changes mid-board. On an edge, you only have 3/4″ to 1-1/2″ of surface, so a single chip 1/32″ deep ruins the joint. Unlike face jointing where you can take the board to the planer afterward, an edge tearout is the final surface.
Straight-knife jointers cut with a true 90-degree chop. At 5,000 to 6,000 RPM with three knives, the knife hits the wood at an angle close to perpendicular to the feed direction. With straight grain and a shallow cut, that works. With interlocked, curly, or reversing grain, the knife gets under the fiber and pries it out before it cuts it. You see it as splintered patches, usually just before or after a grain reversal, even when the knives are sharp. Dull knives make it dramatically worse – a straight knife that has jointed 300-400 linear feet of hardwood without honing will start to crush and tear even on cherry.
As an Amazon Associate we earn from qualifying purchases at no extra cost to you.


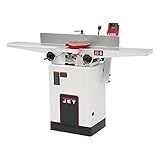

What Actually Reduces Tearout
Three variables matter more than brand or horsepower: cutter geometry, depth of cut, and feed rate. In that order.
Cutter geometry is the biggest lever. A helical or spiral cutterhead with small four-sided carbide inserts arranged in a spiral does not hit the wood square. Each insert is set at a slight shear angle, typically 10 to 14 degrees, and has a small radius. It slices the fiber at an angle, much like a skew cut with a hand plane. That shearing action lowers tearout on figured wood by a wide margin. It does not eliminate it completely, but it turns deep tearout into light fuzz you can remove with one pass of a block plane.
Depth of cut is second. On a straight-knife jointer, dropping from a 1/16″ cut to a 1/32″ or 1/64″ finish pass halves the load on each knife and reduces how far a lifted chip can propagate. On a helical head you can get away with a heavier cut, but for a glue edge on curly wood, a final spring pass at 0.010″ to 0.015″ after your main straightening cuts still produces a noticeably cleaner edge.
Feed rate is third. Feeding slower gives each insert more cuts per inch. At 4-6 feet per minute on a jointer, you get roughly 60-90 cuts per inch with a typical helical head, versus trying to push at 15 feet per minute and getting 20-30. Slower is cleaner, up to the point where you start to burn or get an uneven edge from dwelling.
Cutterhead Choice: Helical vs. Straight Knife
If low tearout is the primary goal, a helical head is the right choice and worth the cost difference. Straight knives can be honed razor sharp and will produce a glassy edge on straight-grained stock, but they have no shear angle to help on difficult grain. You have to compensate entirely with very light cuts and perfect grain direction reading, and you still lose boards.
True helical heads use inserts set at a shear angle, often called a helical insert head. Segmented spiral heads with inserts set square to the table are less effective for tearout – they are quieter and easier on straight knives for nail hits, but they don’t shear. When you shop, look for inserts described as positioned at an angle or with a shear cut. That detail matters more than the number of inserts.
Noise and maintenance are part of the trade-off. A helical head jointer runs 10-15 dB quieter than a straight-knife machine and you rotate inserts when nicked instead of removing and resetting knives. Four-sided carbide inserts last 10 to 30 times longer than HSS knives in hardwood, and you don’t need a knife-setting jig. Replacement cost is higher per edge – a full set of inserts is $120-$200 for a 6″ and $180-$300 for an 8″ – but you replace four inserts at a time, not the whole head.
The honest downside: helical heads can leave a very faint scalloped pattern on the edge, about 0.001″ to 0.002″ deep, visible in raking light. It has no effect on glue strength with modern PVA or hide glue, and it disappears after one or two swipes with a jointer plane or 180-grit on a flat block. If you want a dead-flat, polished edge straight off the machine for a show joint, straight knives freshly sharpened will look cleaner on straight-grained stock. For figured wood, helical still wins on total defect-free yield.
Size and Bed Length Matter for Edges
For edge jointing, jointer width determines what you can face-joint, but length determines how straight your edge will be. A 6″ jointer can edge-joint any board that fits on its tables, regardless of board width, because you run the edge down. The limitation is bed length. A typical benchtop 6″ has 30″ to 32″ of total table. An 8″ stationary jointer has 65″ to 75″. For boards under 36″ long, a short bed is fine. For 48″ to 72″ boards for tabletops, a short bed makes it hard to keep the edge from rocking and you will get taper or a slight hollow even if tearout is low.
Power is rarely the constraint for edge cuts – even a 1 HP motor handles a 1/32″ edge cut in hard maple. What matters is table flatness and fence rigidity. A fence that deflects 0.005″ under hand pressure will give you an edge that is not 90 degrees, and clamping will open the glue line later. Cast iron tables and a rack-and-pinion or solid locking fence stay put better than aluminum extrusions on lightweight machines. If you are choosing between a 6″ helical benchtop and a used 8″ straight-knife stationary machine for the same money, the 8″ will give you straighter long edges but more tearout on figured wood unless you upgrade the head.
Comparison by Jointer Type
| Type | Tearout on Figured Wood | Edge Straightness (48″+ board) | Knife Maintenance | Typical Price Range |
|---|---|---|---|---|
| 6″ Straight Knife, Benchtop | Poor – frequent chips on curly/reversing grain | Fair – short bed allows rocking | Frequent honing/resetting, low cost per change | $300 – $550 |
| 6″ Helical Insert, Benchtop/Stationary | Good – shear cut reduces deep tearout | Fair to Good – depends on bed length | Rotate inserts as needed, no jig | $550 – $900 |
| 8″ Straight Knife, Stationary | Poor to Fair – same geometry, more stability helps with light cuts | Good – 66″+ bed | Less frequent but full knife setting required | $800 – $1,400 |
| 8″ Helical Insert, Stationary | Very Good – best combination for low tearout edges | Very Good – long bed plus shear cut allows light final passes | Rotate inserts, long intervals between changes | $1,200 – $2,400 |
If you primarily edge-joint straight-grained poplar, soft maple, alder, and walnut, any of these will produce glue-ready edges when set up correctly. If you regularly work with curly maple, hickory, white oak, or exotics with interlocked grain, the helical head pays for itself in saved material after a few boards.
When the Cheaper Option Is Fine
You do not need an 8″ helical jointer to get clean glue edges on most domestic hardwoods. A well-tuned 6″ straight-knife jointer with sharp knives, tables coplanar within 0.002″ over their length, and a technique of taking two straightening cuts at 1/32″ followed by a 1/64″ finish pass with the grain will joint straight-grained stock with almost no tearout. If your work is under 40″ long and you don’t chase figured wood, put the money toward sharpening and setup rather than a new head.
Where the cheaper option fails is repeatability on difficult grain. If you find yourself flipping the board end-for-end trying to find a grain direction that doesn’t tear, or jointing and then spending ten minutes scraping out chips, that is labor you pay for on every project. In that case, upgrading to a 8 inch helical jointer with a long bed removes the variable you can’t control – grain direction – and gives you more stable support for long edges at the same time.
The middle ground many shops take is a 6″ helical stationary machine. You keep the footprint and 120V power, get the shear cut, and accept that you will use a longer straightedge and hand-plane technique for boards over 4 feet. For a small shop building cabinets and small tables, that compromise works well.
Setup for the Cleanest Edge
Whatever head you run, check these numbers before you blame the wood. Outfeed table height should be exactly at cutterhead apex – a straightedge resting on the outfeed should just kiss the knife/insert at top dead center and drag no more than 0.001″ when you rotate by hand. Tables should be coplanar within 0.003″ end to end; more than that and you will cut a taper that looks like tearout when you try to correct it with pressure. Fence should be square to tables within 0.002″ over 4″ of height, checked with a reliable square, not the built-in scale.
For the final edge, wax the tables, set depth to just under 1/32″, and feed at a slow, steady pace without stopping. Keep pressure on the outfeed table once 6″ of board has passed the cutter, not on the infeed. Make one light final pass without changing depth – the slight spring of the machine takes off a few thousandths and cleans up any remaining crush marks. If you still see tearout, try feeding the opposite direction; on many boards the edge grain reverses from the face grain. With a helical head, grain direction matters less, but it still helps on wild figure.
If you run a straight-knife machine and want to reduce tearout without replacing the head, consider a jointer helical cutterhead upgrade sized for your model. Most 6″ and 8″ jointers have drop-in helical replacements that reuse the original bearings and pulleys. Installation takes 2-3 hours and requires a dial indicator to set bearing preload, but it is the single most effective change for low-tearout edge jointing short of buying a different jointer.


