
What's inside
- The Main Types of Woodworking Clamps
- 1. Bessey K Body REVO KRE3524 Parallel Clamp
- 2. IRWIN Quick-Grip One-Handed Bar Clamp
- 3. Bessey BPC-H34 Pipe Clamp Fixture
- 4. Kreg Face Clamp
- 5. IRWIN Quick-Grip Mini Bar Clamps
- How Many Clamps Do You Need?
- What to Check Before You Buy
- Glue-Up Tips That Make Clamps Work Harder
- Common Mistakes
- Frequently Asked Questions
- Conclusion
- The Main Types of Woodworking Clamps
- 1. Bessey K Body REVO KRE3524 Parallel Clamp
- 2. IRWIN Quick-Grip One-Handed Bar Clamp
- 3. Bessey BPC-H34 Pipe Clamp Fixture
- 4. Kreg Face Clamp
- 5. IRWIN Quick-Grip Mini Bar Clamps
- How Many Clamps Do You Need?
- What to Check Before You Buy
- Glue-Up Tips That Make Clamps Work Harder
- Common Mistakes
- Frequently Asked Questions
- Conclusion
As an Amazon Associate I earn from qualifying purchases. This post may contain affiliate links at no extra cost to you.
Start with four to six parallel-jaw or bar clamps in the lengths you use most, add a few one-handed clamps for quick holds, and buy pipe clamps or specialty clamps only when a project needs them. Clamps are the quiet backbone of a woodshop, and the right mix saves time and prevents ruined glue-ups. This guide explains each type and what to look for.
| Pick | Best for | Key feature |
|---|---|---|
| Bessey K Body REVO KRE3524 | Panel glue-ups and cabinet assembly | Parallel jaws that stay square |
| IRWIN Quick-Grip One-Handed Bar Clamp | Quick holds while you work alone | One-handed operation |
| Bessey BPC-H34 Pipe Clamp Fixture | Long, adjustable-length clamping | Uses standard pipe you supply |
| Kreg Face Clamp | Pocket-hole joints and face frames | Deep reach and a locking design |
| IRWIN Quick-Grip Mini Bar Clamps | Small parts and tight spaces | Compact size and light weight |
Contents
- The Main Types of Woodworking Clamps
- 1. Bessey K Body REVO KRE3524 Parallel Clamp
- 2. IRWIN Quick-Grip One-Handed Bar Clamp
- 3. Bessey BPC-H34 Pipe Clamp Fixture
- 4. Kreg Face Clamp
- 5. IRWIN Quick-Grip Mini Bar Clamps
- How Many Clamps Do You Need?
- What to Check Before You Buy
- Glue-Up Tips That Make Clamps Work Harder
- Common Mistakes
- Frequently Asked Questions
- Conclusion
Our Top Picks
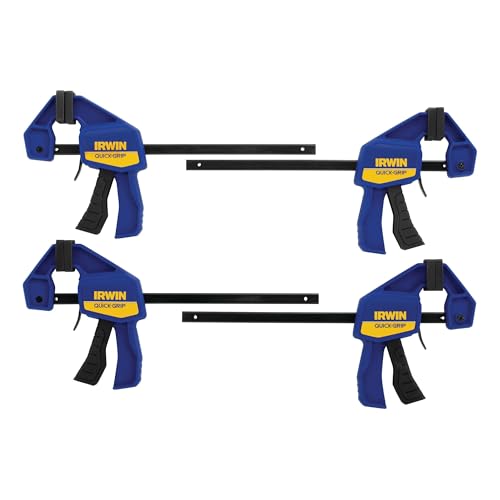 IRWIN Quick-Grip 1964758 One-Handed Mini Bar Clamp 44 Count (Pack of 1)21 x 8 x 2.5 Inches1 poundsCheck on Amazon

The Main Types of Woodworking Clamps
Parallel-jaw clamps
These have large, flat jaws that remain square to the workpiece, which prevents panels from bowing during glue-ups. They are the premium choice for cabinets and furniture because they apply even pressure across the joint. They cost more per clamp, but they make assembly easier and more accurate.
Bar clamps
A bar clamp has a fixed head and a sliding tail on a steel bar. They are versatile and available in many lengths. Cheaper bar clamps may flex under load, so use cauls to keep panels flat.
Pipe clamps
A pipe clamp uses a fixture on a length of standard pipe, so you can make clamps as long as you need. They are economical for wide panels and large frames, but the pipe adds weight and can leave rust marks on bare wood if not protected.
One-handed clamps
These squeeze with a trigger, so you can hold a workpiece with one hand and clamp with the other. They are great for quick holds, but they apply less force than screw clamps and are not meant for heavy glue-ups.
Spring, C, and specialty clamps
Spring clamps are for light holding. C-clamps are strong and compact, ideal for metal and jigs. Face clamps, edge clamps, and corner clamps solve specific problems, such as attaching edging or holding mitered corners.
1. Bessey K Body REVO KRE3524 Parallel Clamp
The K Body REVO is a reference parallel clamp used by many cabinetmakers. Its large jaws keep panels square, and the handle design gives good control. It is great for glue-ups where you need even pressure across a wide joint. The drawback is cost, since building a full set takes budget, so buy a few at a time. Choose lengths based on the panels you build most often.
Bessey K Body REVO KRE3524 Parallel Clamp
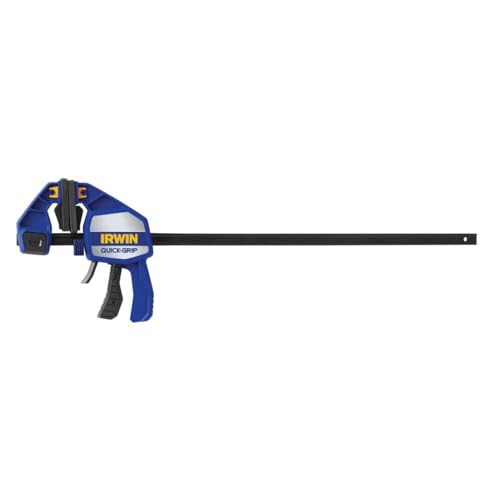
2. IRWIN Quick-Grip One-Handed Bar Clamp
Few clamps are as handy as the Quick-Grip. You can position the work with one hand and squeeze the trigger with the other, which is perfect when you are working alone. It is great for holding a fence to a jig, tacking parts in place, and temporary assembly. It is not intended for heavy glue-up pressure, and long clamps can flex. Keep several in different lengths.
IRWIN Quick-Grip One-Handed Bar Clamp
3. Bessey BPC-H34 Pipe Clamp Fixture
If you need very long clamps on a budget, pipe clamps are the traditional answer. The Bessey fixture pairs with three-quarter inch pipe, which you buy separately in the length you require. They provide strong pressure and are good for wide tabletops. Be careful that the pipe does not touch bare wood for long, as it can stain. Use wax paper or blocks to protect the surface.
Bessey BPC-H34 Pipe Clamp Fixture
4. Kreg Face Clamp
Pocket-hole joinery often needs a clamp that holds the faces flush while you drive screws. The Kreg face clamp has a deep reach and locks in place, which makes it a favorite for face frames and cabinet assembly. It is more specialized than a bar clamp, so it will not replace your general clamps, but it solves a very specific problem well. It is useful if you build with pocket screws regularly.
5. IRWIN Quick-Grip Mini Bar Clamps
Small projects need small clamps. Mini bar clamps are easy to handle for jewelry boxes, picture frames, and small glue-ups. They fit in tight spaces where a large clamp will not. Their clamping force is modest, so do not expect them to pull a bowed board flat. Keep a handful in a drawer, because you will be surprised how often they come in handy.
IRWIN Quick-Grip Mini Bar Clamps
How Many Clamps Do You Need?
There is an old saying that you can never own too many clamps, and it is mostly true, but you can build a sensible collection over time. A practical starter kit is four parallel clamps in a medium length, such as 24 inches, plus four one-handed bar clamps, two or three spring clamps, and a pair of mini clamps. This covers panel glue-ups up to about the width of a small tabletop, and it will see you through most beginner projects.
As your projects grow, add longer clamps for bigger panels, and build up to six or eight parallel clamps for cabinet work. When you glue a panel, you generally want a clamp every 8 to 12 inches, alternating above and below to balance pressure. If your budget is limited, buy fewer, better clamps rather than many weak ones. Good clamps last decades and hold their value.
What to Check Before You Buy
- Jaw size and depth. Larger jaws spread pressure and cover more surface.
- Throat depth. Deeper reach helps clamp farther from the edge.
- Bar stiffness. A flexing bar loses pressure on long clamps.
- Handle comfort. You will tighten these many times.
- Clamp pads. Soft pads protect the wood from dents.
Glue-Up Tips That Make Clamps Work Harder
Clamps are only part of a good glue-up. Rehearse the whole process dry, with every clamp set to roughly the right opening, before you open the glue bottle. Once glue is on the joint you have limited open time, and scrambling for a clamp ruins the panel. Lay down wax paper or packing tape under the joint so squeeze-out does not bond the work to your bench.
Use cauls, which are straight scrap boards clamped across the panel, to keep the surface flat when bar clamps pull the joint together. Slightly curved cauls apply pressure at the center, which helps the joint close evenly. Alternate clamps above and below the panel so the pressure balances and the boards do not bow. Check for square by measuring diagonals on frames and boxes before the glue sets, and adjust with a light tap or a clamp across the corners.
Finally, give the glue enough time. Most wood glues need around thirty minutes of clamp time and a full day before heavy stress, though you should read the label. Removing clamps too early is a common cause of failed joints, and leaving them on longer is rarely a problem. Label your clamp sets by length so you can find them quickly the next time you need them.
Common Mistakes
- Overtightening. It squeezes out glue and can bow the panel.
- Using only one type. Different jobs need different clamps.
- Letting steel touch wet glue. It can leave dark stains in some woods.
- Not dry-fitting. Always rehearse the clamping before applying glue.
- Buying many cheap clamps. Quality matters for glue-ups.
Frequently Asked Questions
What size clamps should I buy first?
Two-foot clamps are a flexible starting point. They handle most small and medium glue-ups.
Are parallel clamps worth the price?
For cabinet and furniture work, many woodworkers think so. They simplify alignment and reduce racking.
Do I need pipe clamps?
Only if you work with very wide panels or need very long clamps at a low cost.
How much pressure should I use?
Enough to close the joint and form a thin line of glue squeeze-out. More pressure is not better.
Conclusion
Choose clamps for the work you do: parallel clamps for precision, one-handed clamps for speed, pipe clamps for length, and mini clamps for small jobs. Based on specifications and reviewer feedback, the examples above are dependable starting points. Build your collection slowly and buy quality where it counts.
As an Amazon Associate we earn from qualifying purchases.
Related guides
More from Amazon
Programs that pair well with the guide above. Offers and eligibility are set by Amazon and may change.
A free business account with business pricing and bulk-buying tools for work, shop or home office.
Create a business accountFree shipping on eligible items, Prime Video and more. Eligible new members can start with a free trial.
Start a Prime free trialAudiobooks and podcasts to listen to on the go. Eligible new members can start with a free trial.
Try Audible freeAd-free music streaming. Eligible new subscribers can start with a free trial.
Try Music Unlimited freeAs an Amazon Associate we earn from qualifying purchases.
Write Your Review
No reviews yet. Be the first to share your experience!