Best Jointers for Preparing Cabinet Door Components
What's inside
As an Amazon Associate I earn from qualifying purchases. This post may contain affiliate links at no extra cost to you.
Cabinet doors punish small errors. A bowed stile won’t sit flat in a cope-and-stick joint, a slightly cupped rail leaves a visible gap at the panel groove, and an edge that isn’t square leaves a glue line you can’t hide under finish. A jointer is the machine that fixes this before you mill profiles. For door work, you’re jointing two things: faces to get a flat reference side, and edges to get a square, straight glue edge for panels or for laminating stock.
If your doors are solid frame-and-panel with no edge-glued panels, you can get by with a smaller jointer. If you glue up panels from 4/4 or 5/4 stock, or mill your own stiles and rails from rough lumber, bed length and cutterhead quality matter a lot more.
As an Amazon Associate we earn from qualifying purchases at no extra cost to you.



Contents
What actually matters for door parts
Door stiles are typically 28″ to 48″ long, rails 10″ to 24″ long. All of them are narrow, usually 2″ to 3-1/2″ wide. That means you are almost always face-jointing narrow stock and then edge-jointing it. Two specs control the result:
Bed length. A short bed will not support a 36″ stile flat. You can joint it, but the ends will drop off the tables and you’ll introduce taper or a slight bow even if the tables are coplanar. For doors, a total bed length of 60″ or more is noticeably easier to use than 46-55″ benchtop beds.
Table coplanarity and fence squareness. If the infeed and outfeed tables are not in the same plane, you’ll get snipe or a convex edge no matter how sharp the knives are. If the fence is even 0.3 degrees out, an edge that looks square will show a V-shaped glue line when you flip one board. This is the most common failure on low-cost benchtop jointers with aluminum fences that flex when you press against them.
Width matters less than people think for doors. A 6″ jointer handles any stile or rail. It only limits you when face-jointing wide panel boards before planing. An 8″ jointer lets you flatten a 7-3/4″ board in one pass instead of ripping it first, which saves time if you buy rough lumber.
Benchtop 6″ vs. floor-standing 6″ vs. 8″
All three will produce a door, but they fail in different ways.
Benchtop 6″ jointers (30″ to 35″ beds): Cheap, light, and easy to store. The problem is mass and length. At 25-45 lbs, they move if you push hard. The short tables make it hard to keep longer stiles flat without adding roller stands, and roller stands introduce their own alignment errors. The fences are usually short, extruded aluminum, and will deflect 0.010″ to 0.020″ under hand pressure. For occasional shaker doors from S4S stock, they are adequate. For milling from rough 4/4 maple or hickory, you’ll fight tearout and table flex.
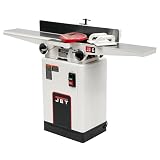
Floor-standing 6″ jointers (55″ to 66″ beds): This is the baseline for regular door work. Cast iron beds, heavier fences with positive stops at 90 and 45 degrees, and induction motors that don’t bog down in hard maple. You still have the 6″ width limit, but the longer bed lets you face-joint a 36″ stile without rocking.
Floor-standing 8″ jointers (72″ to 76″ beds): The practical upgrade if you build kitchens. The extra width lets you face-joint most panel stock without ripping, and the extra bed length and mass make it easier to hold tolerance. A decent 8″ machine will keep tables coplanar within 0.001″ to 0.002″ over the length if you set it up on a flat floor. It also typically has a 2HP motor vs. 1HP on a 6″, which matters when taking a 1/16″ face cut on 6″ wide hard maple.
For many small shops, a good 6 inch floor jointer paired with a 13″ planer is the most cost-effective way to produce flat, square door stock. If you regularly glue up 12″ to 18″ panels and buy rough lumber by the bundle, an 8 inch jointer with helical head pays for itself in less waste and fewer rejected panels.
Straight knives vs. helical heads
For rails and stiles, cutterhead type affects two things: tearout on figured wood and maintenance.
Straight-knife heads (2 or 3 knives) cut cleanly when sharp, but on woods like curly maple, cherry with grain reversal, or hickory, they will tear out if you take more than a 1/32″ cut. You can reduce it by taking a very light 1/64″ final pass and feeding slowly, but you will still get occasional divots that show after you profile the edge.
Helical or segmented cutterheads with 4-sided carbide inserts leave a slightly scalloped surface that planes out easily and they cut with a shearing action. In practice, they reduce tearout by about 70-80% on the same species and stay sharp 10x longer because you rotate an insert instead of regrinding knives. They are also quieter by 8-12 dB. The downside is cost: typically $150 to $350 more than the same machine with straight knives, and inserts cost $30-$50 per set of 10 when you eventually need them.
Cross-grain tearout at the end of a rail is a jointer problem too. Even with a helical head, jointing the end grain of a short rail will blow out the trailing corner. Joint with the grain direction on edges and take rails down to length after jointing and planing.
If you’re on a budget and work mostly in straight-grained poplar, soft maple, or alder for painted doors, straight knives are fine if you keep them sharp. If you build stained cherry or natural maple doors, the helical head is not hype — it prevents the one defect that ruins a door face.
Comparison for door work
| Machine Type | Total Bed Length | Motor | Best For | Limitation for Doors |
|---|---|---|---|---|
| Benchtop 6″ – straight knife | 30-35″ | 10-13A universal | Occasional doors from S4S stock, small shop | Short bed causes taper on stiles over 30″; fence flex hurts square edges |
| Floor 6″ – straight knife | 56-66″ | 1 HP induction | Regular frame-and-panel doors, budget milling | Must rip wide panel boards to under 6″ before face jointing |
| Floor 6″ – helical | 56-66″ | 1 to 1.5 HP | Stained hardwoods, figured grain | Same width limit, but far less tearout |
| Floor 8″ – helical | 72-76″ | 2 HP induction | Batch cabinet doors, rough lumber, glued panels | Cost, footprint (82″ long with guard), 240V on some models |
Setup and technique that actually prevents gaps
Most door problems blamed on the jointer are setup problems. Check these before you buy a new machine:
Tables coplanar, not just flat. Use a 36″ or 48″ straightedge. With the guard off and the machine unplugged, check for a gap under the straightedge when it spans both tables. Any light under the center means the tables are pivoted. Adjust the gibs or eccentric bushings per the manual. Even 0.003″ of droop on the infeed table will put a 0.010″ hollow in a 30″ edge.
Fence square under pressure. Set fence to 90 degrees with a machinist square, then press a board against it as you would when cutting. Recheck. If it moves, the fence lock is weak or the fence is twisting. Add a wooden auxiliary fence face only if the underlying fence is rigid — it won’t fix flex.
Depth of cut. For door edges, take 1/32″ to 1/16″ per pass, not 1/8″. Heavy cuts on narrow stiles cause the board to bow away from the fence mid-cut. For faces, a 1/16″ cut on 6″ wide stock is the max most 1HP jointers handle without scalloping.
Pressure. On face jointing, press down only over the outfeed table after the first 6″ of the board is over the cutterhead. Pushing down over the infeed table flexes the board into its bow and you joint a curve, not a flat.
Dust collection. A jointer without dust collection will pack shavings under the outfeed table and lift the workpiece 0.005″ to 0.015″. That shows up as a tapered edge that you chase forever. Even a shop vac on a 4″ port helps if the fence design allows it.
What to buy for your shop
If you build 5-10 doors a year from pre-surfaced stock and have a planer already, a benchtop is usable if you keep expectations low. Look for a cast-iron table version with a rack-and-pinion fence, not a flip-lever aluminum fence. A benchtop jointer 6 inch in this class will joint short rails well but will require careful extension supports for stiles.
If you build a full kitchen or batch 20+ doors, get a floor-standing jointer. The cheapest way to get door-ready edges that glue without clamping pressure is a long cast-iron bed and a fence that locks dead square. Helical is worth the premium if you work in maple, cherry, or white oak where grain changes direction at knots and rays. If you only build painted poplar doors, put the money into longer beds and better dust collection instead.
Don’t overspend on width you won’t use. An 8″ machine does not make a 2-1/4″ stile any flatter than a well-tuned 6″. It helps with wide panel boards and with stability, not with narrow parts. Measure your typical panel glue-ups: if you never face-joint anything over 5-1/2″ wide, the 6″ floor model is the rational choice. If you buy 6″ to 8″ wide rough boards to save money, the 8″ is where you see the return.
Finally, plan your workflow: jointer for one flat face and one square edge, planer to bring to thickness and parallel, table saw to rip the opposite edge parallel. No jointer makes a board parallel — it only makes it flat. If you skip the planer step and try to get thickness on the jointer, rails will vary 0.020″ and the door frame will show steps at the joints.



